Showing posts with label techniques. Show all posts

Tuesday, May 15, 2007

A tale of 2 sock toes


Recently on KR there was a question on the possibility of making socks using double knitting.

SaraKate linked in that post to this, describing how to start a double knit toe. Its pretty close to what I do, so I'll just go with that description. Double knitting socks is not new, Kory at Knitty covered it back in 2006, and there are literature based reports from as early as 1860!


For a while I did toes this way, and I am not sure how or why I started. Maybe the purchase of the Montse Stanley book, 30+ cast on on techniques to play with - my perverse idea of heaven. I also forgot - or got mesmerised by the figure 8 cast on so have been using that in many forms, on dpns and on circulars. Not only that, I have also experimented with
Wendy J's short row toe with a provisional cast on across the knuckles. Any- way that KR post sparked my memory and I decided to resurrect the technique.

The toe in this image was to match the first sock already knit for Toby, in Regia stripe on 2mm dpns. So I invisibly cast on using a 1.75 mm dpn, and knit a few cm's. While it worked, it was much more open than the other toe so I frogged it and started again on 1.25mm dpn's. I had forgotten that you really need to use a needle almost half the size of the one for the body of the sock. That is because the extra yarn that reaches between the stitches when you knit double, ends up in each stitch, the stitches grow once off the needle. The toe knit on the 1.25 mm dpns is that shown in the final comparison image.


Standard double knitting, k1s1 with yarn in front, turn and repeat. Some thinking and planning is required to sort the increases - but not impossible. I could have gone on knitting double until the heel gusset was finished - but I was in to much of a hurry to show you all, so I rushed the toe.

So whats the verdict? I now remember why I stopped doing this toe. It produced what could only be described as a square flare toe. In my last toe photo, the figure 8 cast on is on the left, and the invisable double knit toe on the right. Notice the lines of knitting and how they flare out at the toe. That flare was worse, much much worse last night. Before I left the sock toe to its own devices - I attempted to bring it into line with my expectations. I folded it mid sole, and mid instep and finger pressed the toe into a neat curve - an attempt to squish a rounded appearance into the toe and reduce the square flare effect. It was semi-successful. Both socks have a cast on of 20 stitches, 10 on the sole, and 10 on the instep, notice how much wider the double knit toe is?


Will I use this toe again, maybe, it is quick and easy, and after a wash or two it appears the same as any other toe up sock. It is firmly part of my technique tool kit, and I do this for gloves and mittens and thumbs, double knitting is very handy to know about. In the dark yarn, at night it was easier to do this toe than to tug a figure 8 cast on into the same firmness as the surrounding stitches. It always takes me ages to carefully re-arrange the tension in that first row so the knitting appears seemless.

Will Toby ever notice he has one square flare toe and one more rounded - probably not.

Saturday, April 28, 2007

Dark hot chocolate -almost as good as coffee!


Today, happyness is hot dark chocolate, frustration with the NZ postal service, I'm knitting that corrugated ribbing, and showing you what mine looks like in photos and how I knit that (videos).

I'm so happy, I'm almost dancing around the house happy, this is back in town, dark, dark hot choc. Supplies are intermittent, so we stock up, 3-4 cans at a time and nearly cry when it is unavailable. The kids love it with hot or cold milk. We zap a cup of milk or water in the microwave and then wizz it in our plastic old milk shake machine and get foamy steamy hot choc, with froth so thick you can eat it with a spoon - magic. The kids get this, or water or plain milk, or honey in milk, no soft drinks, no fruit juice, and visiting kids suck this up like nothing I've seen. I take mine hot no froth-flat, dairy free with soy milk, and Bear has his with hot water and frothed. Double and Tripple Magic. And its good for the environment and other people :D. Can it get any better? You have to heat it up to disolve or use a machine to beat it into a liquid and its not like cocoa - it is more like dark chocolate. Liquid dark chocolate - heaven, this stuff is almost as good as coffee.


And this is officially a very dangerous good. Can you believe it? A new friend offered to do a really really nice favour, and which will cost her postage to me, from New York. A thank you was needed. I found these little cutie magnets, with a really cheesy slogan. Pauaful magnets, empaua your fridge. At this point I might need to explain that the shell used to decorate them was popular in new zealand in tourist, and kitch things but recently has become very much in fashion for art and contemporary jewellery and is called Paua. There is the cutest kiwi, a koru, gekco, bone fishing hook, and clematis, I thought it was a good 'from nz gift'.

New Zealand Post has a complete ban on dangerous substances like explosives, firecrackers, money and strong magnets. And oven cleaner!, it is listed on the banned substances list, tell me who, who, who in the world would post oven cleaner to any one? So Bear, as he works over a post office went off to post late last week. New Zealand Post are emphatic, these can not be posted. No way, Nadda, nitch, nein, not on your nelly. Still if magnets wipped my bank card magnetic strip in the mail - well I'd be more than a little miffed. Never mind - I've found something not knitterly but useful to a knitter that is confirmed new zealand post approved. And its winging away.

So I'm knitting on my Fana inspired Cardie, and well into the corrugated rib, shown here, front and back. No news of more yarn, but a girls gotta knit, and this is what I got to knit. It has only been 2-3 nights knitting so far - I could do that again if I had to. I think the variations in the spacing of the floats on the back are small inconsitencies in holding the red or purl yarn above or below the blue. I freely admit to not being at all perfect, but do want to improve where I can. Since noticing that I've tried to be more consitent. I love the way the floats across the back flatten the rib, and push the purls forward, it makes a nice texture that is not immediately recognisable as ribb.


First how to knit easy-peasy corrugated rib, or at least how I worked out to do this. Never being taught or seen this in in the 'yarn', only pictures and descriptions, this is what worked best for me when I tried. What I love about way this is that I just look and scoop the colour I need, no translating, colour to hand required. No "Red, that means the left hand, so move left hand, blue next, so thats in the right, switch hands and move the right hand". Me I'm left right confused, never can tell instantly which is which, always have to think about that. But it works for many, and I did knit a colourwork sweater once that way.

Begining with how I wrap the yarn around my left hand. The purl yarn has to go over the first finger and then the knit yarn over the 2nd finger. Never works the other way around.


and then a closer look at the knitting in progress. It is at this stage i was thinking that using fingering yarn might not have been the best stuff to demonstrate on - but thats what I'm knitting at the moment. And thanks for the nice comments, Suzzane and Wendy, and KathyR. It makes it feel not like writting to a large dark web void.


post script - latter that night
Having a little look around the web last night I found several on line videos where knitters knit close to how I knit. This one is the closest to how I purl, and Potansiyelariza's video. i know now I am not alone in my knitting like this, Wendy - the knit'n guru (could it be ???) left a comment that she knits just like me (not purl though), this video seems to make purl use as many fingers as they can - which is something I found difficult to do, although the first time I knit my cabled zippie cardie (- before I blogged), I knit it that way. At times I've got two left feet and maybe it follows two left hands?

Saturday, March 24, 2007

sewing up the Fish afghan, ... oh & finished socks


There is a discussion on Knitters Review forum about methods of joining the fish. Most people seem happy to crochet, and while I can crochet I wanted something flatter, something more sublte. Firstly this is my mini school of fish swimming amongst the stones under our washing line. For now they lie flat, although on a table not on rocky ground, I expect they will still be flat after all are joined, and if not a wet block will solve that problem. I do notice many many knitters say the blanket is wavey and they accept that and kind of like that, I guess I will kind of like that to if waves result.

The following is a photo-essay of how I joined my fish, progress images of the 'side' seam and tail seams. I have included images of the weaving in, and the final one of a close up of the seams from the right side. I stitched my fish 'wrong' sides up, flat on the table or over my fingers. the sharp eyed of you will not I seamed an orange tail to a white one, to show the stitch clarity, then undid this to stitch the white tail to a varigated tail as they will be in the final blanket. No really I made a mistake and and had to undo it. When seaming - I tried to stitch through the upper most edge loop, on the wrong side, leaving the other side of the loop to show on the right side. I did stitch from left to right and then for the next stitch from right to left and so forth, note I have not included the whole serries of photos as some were fuzzy and not focussed.


....and the modified Widdershins heel Regia stripe socks are finished, and they apparently fit perfectly, and no he does not read my blog (as far as I know), but he knows I blog 'things knitting'. The sizing system worked, knitting from the toe and increasing every 2nd row until the sock width is the same as a tracing of the sole. Next time I might allow another set of gusset increases, just for ease over the ankle.

First image is the socks of a mans feet at leisure, and the second my very cheesy take on the current mode of photographing socks on feet from behind when posed ballet style. Both images show the heel nicely. Note the carefully selected background of vintage sewng books.

Tuesday, February 06, 2007

Fish (n=43), and a new sock starts


I have been fishing, well knitting more fish, to date the fish count is now 43 fish, almost a school. All in sock yarn. As i knit each batch of between 5 and 10, I hand wash, lay out to dry on a plastic basket in a sunny spot, and store them away. That way I won't have to block 120 fish all in one go latter this year. I don't know if I need 120 fish, just a random number. This image shows my stack of 10 fish, all ready to block. I finished one of opal sock yarns i was using, and about to work my way thru a small tangle of left over Regia yarn.

And co-joined fish, a pattern that works, and given this is my first written for others pattern, feel free to notify me of corrections needed so I can amend the original.

Instructions for co-joined fish – nose down next to tail up.
Note : make sure to twist/wind the tow colours together where they meet, or you will have separate fish.

Abbreviations - I think these are pretty standard
S1 = slip one purlwise, produces a chain edge, very pretty and makes the fish easy to sew or crochet together if knitting single fish.
m1 – make one using twisted loop,
K2 tog = knit 2 together (leans to the right)
Ssk = slip next two stitches one at a time knitwise, then knit those two tog (leans to the left)
M1 lifted increase = lift loop of stitch from previous row, and knit, can use either last stitch on right needle, or first stitch on left.

When you finish one pair of fish, or several pairs of fish, then just knit the next row of fish, reversing the bracketed instructions. Yellow is nose up, Blue is tail up.

(Cast on 6 stitches using yellow)(Cast on 23 stitches using blue)
Row 1
(S1, k to end of blue)(S1, k to end of yellow).
Row 2 (Yellow S1, m 1, k to last stitch, m1, k1 (8))
((Blue S1, k2 tog, knit to last stitch3 stitches k2 tog, k1 (21)).
Row 3
( S1, k to end of blue)(S1, k to end of yellow)
Repeat rows 2 and 3, continue to increase yellow and decrease on blue every 2nd row until there are 20 yellow stitches, and
9 blue stitches.

Row 5 (S1, k to end of yellow)
(S1, K to end of blue) .
Repeat this row 5 2 more times – reverse as appropriate for colours.

Begin fin shaping
Row 6 (S1, k4, p10, k to end of yellow)
(Sl, k to end of blue ) .
Row 7
(S1, K4 m1, k to end of blue) (S1, k4, ssk, k6, k2tog, k to end of yellow)].
Row 8 (S1, k4, p8, k to end of yellow)
(Sl, k to end of blue ) .
Row 9
(S1, k4, m1, k to end of blue) (Sl, k4, ssk, k4, k2 tog, k to end of yellow).
Row 10 (S1, K4, p6, k to end) (
S1, K4, p1, k to end)
Row 11
(S1, k5 m1 lifted increase, k to end of blue) (S1 k4 ssk k2 k2tog k to end)
Row 12 (S1, k4 p4 k to end)
(S1 k4 p2 k to end)
Row 13 (S1, k4 k1 lifted increase previous stitch, lifted increase next stitch, k to end of blue) (S1 k4 ssk k2 tog k to end)
Row 14 (S1 k4 p2 k to end yellow) (S1 k4 p4 k to end)
Row 15 (S1 k5 m1, k2 m1 k to end blue) (S1 k 4 k2 tog k to end yellow)
Row 16 S1 k4 p1 k to end yellow) (S1 k4 p6 k to end)
Row 17 (S1 k5 m1, k4 m1 k to end blue) (S1 k4 k2 tog k to end)
Row 18 (S1 k to end yellow) (S1 k4 p8 k to end)
Row 19 (S1 k5 m1, k6 m1 k to end) (S1 k3 k2tog k to end)
Row 20 (S1 k to end) ](S1 k4 p10 k to end blue)
Row 21 (S1 k to end blue) (S1 k to end yellow)
Repeat row 21 2 more times, reversing colours to match as needed.

Row 23 (S1 k2 tog k to last 3 stitches, k2tog, k1) (Sl m1 k to last stitch m1 k1)
Row 24 (S1, k to end) (S1 k to end)
Repeat rows 23 and 24 until 23 yellow stitches and 6 blue stitches are on needles,
Cast off (I used a sewn cast off so edges match) – or continue to knit next pair –reverse order of blue and yellow brackets.


Zebra wash cloth, finished but not proud. I really learned the lesson of intense contrasts requiring precision. My kitchener close was messy, the diagonal junctions are messy, I thought the double width and single width stripes would work much better than they do. Just as well it is a wash cloth.


I have also been stash building
, or stocking up, albet in a very small way, I added two sock yarns from Webs on line store, close outs which means 'cheap', ordered last month but only just arrived. The first is a rather boring sock yarn from Regia, it knits into stripes in quite male blues, greys and blacks, but they make such soft yarns that knit well and wear well.
Next to it is another Italian yarn, Cedifra fashion trend sportivo. Webbs was great to shop at, but I stuffed up my order big-time, and ordered two 100g balls of the Regia, and only one 50g ball of the Sportivo. Well, with my big feet I won't be getting socks of that! I have split the Sportivo into two equal length balls, and am knitting a smaller toe up gusset sock with heel flap, a nother widdershins variation as the last sock. This will be much smaller, for Poppy, my 4yo. If not then fish! This sock is on 2.5 mm dpns, and has 48 stitches. The image of the yarn in the ball is very accurate colourwise, the one of the knitting is not - yet was photographed in daylight ?

The other yarn purchases, green rowan 4 ply baby soft and orange schoeller stahl baby merino. Both purchased for the fish blanket. I realised that the fish are very multi-coloured, and when layed out together it is hard to see the fish for the school of fish. I decided to add some plain fish, to tie it all together and to have some fish where the fins and shaping were visable. Given the small size of the finished fish - i couldn't escape the goldfish colour. the Rowan, is beautiful but does not go, so may be saved for me, fair ilse mittens latter perhaps. with cream or off white?

Well, the head cold has well gone, and school started today. Parents of primary and secondary school children all over new zealand breathed a collective sigh of relief as small feet plodded away to classrooms with back packs and packed lunches. 5 child free hours, for me that means a whole day at work, 9 - 5, as after school care resumes. Still our students don't start back until the 19th so a wee breathing space before that.

Saturday, January 06, 2007

knitting and purling - my style left hand carry


Well a new year, a new project or 3, a project completed, and a new technqiue to share. But first the latest item off the knitting pins, a kangaroo pocket jersey for my 7.5 year old son. In teal blue, on 3.24mm's. I made this one up, mostly in advance- but resolve a few details as i worked, like the stripe pattern, and the neck finish to match the ribbing at the hem and on the pockets. Hem is 4 rows garter, 10-12 rows of 2x2 rib, and another 4 rows garter, all on knitting pins one size smaller. I short rowed the back neck, starting when the raglan decreases has achieved 80% of K, and turned 5 stitches short eachtime until only the back stitches remained. Then I knit two rounds to resolve all the short row wraps.


Ages ago i was learnng how to knit with a left hand carry, and to knit with two colours in my left hand and searched the web for help. There are so many good help sites out there but it wasn't until i found a with a video not in english, it was noted as being Finish, (will post link when i find it again) that i found a purl that really made continental work for me. I has been a right hand carry knitter, and before that a pick up the yarn and wind it round the needle, drop it and move the needle knitter, and after that a combined knitter, but I was wanting to do Bohus which required colour work with purl stitches at the same time as carrying multiple yarns in the left hand.

I aplogise for any delay in the images loading, there are 17 that show me ribbing in knit and purl using a left hand. The images were made by my very own non-knitting but very helpful Christopher - and I think he did a wonderful job. At the time I was knitting a shrug for my daughter in sock yarn, in the round on 2.25mm needles. Please ignore the additional needles, focus only on the ones in use. I won't provide much commentary, as the images do show quite clearly the movements in my knitting, I find that i can rib easily and fast using this method. I tension my yarn by winding it around my index finger, which allows me greater control when I carry more than one yarn (each is wound around a different finger), but tensioning around the pinking also works. For me i know i need to carry the yarn towards the tip of my finger and close to the needle tip.


To 'flick' from knit to purl i lift the yarn into place over the left needle tip, and then sweep the tip of my right needle inbehind it when i start the purl stitch. I do find my hands and wrists do much of the work as the needles twist from horizontal to vertical when knitting this way.


Wednesday, October 11, 2006

purl with colours/colors & yarn in left hand

This post was suposed to be a celebration of finishing Blue Shimmer (which I have done) and details of how I blocked and stitched but .... today on Knitters Review Forum I noticed a request for details or info on how people purl with two colors. Much earlier in my blog I provided details and images of how I knit with two colors in the left hand. This is a companian piece to that. I don't know if there would be any value in visiting that post as well. Blue shimmer details - update and the next project very soon - we have fast broadband now and it is sooooo much easier.

These are images I took ages ago when I was working on the colour yoke of Blue Shimmer. It is way overdue and time to dig out the images and write the how-to details. I have also got images of using the finish or norwegien purl in a rib - which i find easier so that comming soon to a blog near you. In the process I think I have also got smarter about uploading and preparing images. These images were saved for web as .gif and the size reduced to 300 across, with an upload time of 11 seconds each on dial up - so I hope they load quickly.

Before I start I do need to point out that to get even colour work (I live in NZ which uses the English spelling so for me colour has a u! - I can spell - sort of) I make sure the stitches are spread out flat not scrunched up on the right needle as I knit. That way the floats are made long enough and my finished work is very flat and dosn't pucker - a trick I learned reading Wendy's blog. That woman is amazing, she seemed to knit Bohus Blue shimmer in less than a month - it took me 9 months.

I used to knit a more 'conventional' purl but since finding the finish purl have used only this way for colour work. I find it almost impossible to knit a more 'conventional' contintal where the right forfinger sweeps the yarn into place when I have two colours in the left hand - some people probably can, but I have not mastered that yet. Notice the yet, I have realised that in time nearly all things are possible. I think I do ok for some-one who is self taught from books and the internet.

Step one, Purling with two colors carried in the left hand,I arrange the yarns so both are over my first finger. I find the yarn wound around that finger has the 'evenest' tension, the one wound around the next finger also comes over that finger but gets slightly looser after 10 or 20 cm's of knitting, so I use that for the yarn which has the longest floats. I could wind it around my pinky and have tried but ... that seems to snag and upset the fore-finger wound yarn so i leave it as is.

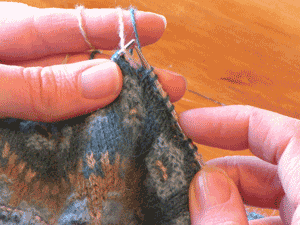
I lift the yarn you are wanting to make the purl stitch in so it sits over the left hand needle, to do that i scoop the left hand needle tip under it.

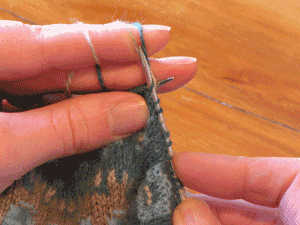
Slide the right needle into the next stitch on the left needle purlwise, then I twist the right needle up and over then down under the purl yarn to pick it up. I bring the needle tip down and scoop or hook the yarn thru the stitch on the left needle.

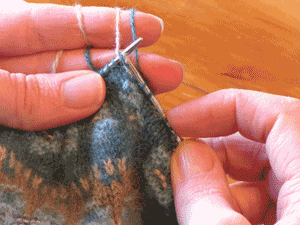
This takes me to a point where I have nearly completed the stitch, I used to have problems keeping my purls stitches as firm as my knits but realise i need to make sure the needle is pushed all the way thru for both the knit and purls. I did have a bad habit of knitting on the tips of the needles so the knit stitches were smaller, and purling on the fullest part of the needle. Now I have worked that out it is much easier to notice when I am making that error and correct myself.
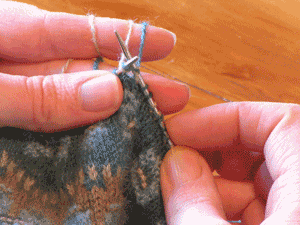
I push the right needle against the left needle and keeping the two in contact swing it around to the back of the work. I make sure the needle is right thru the stitch, that is not just the needle tip, but the widest part of the needle and then I slip the new stitch off and drop the old stitch.

make sure you tug your finger away slighlty to seat the purl stitch in place and remove any slack in the yarns before the next stitch.

To work with the other colour is very simillar, just pick up the yarn colour that i required and lift it over the needle to start.