Friday, December 20, 2019

A stitch in time, or maybe a little late

One of the first rules written in historic texts on mending is to reinforce thin or weak spots before they form holes. This is useful advice, it is far easier to patch or reinforce a thin spot than it is to patch a hole or tear. But there are times when 'fashion'  or convention dictate that something not be mended. I once worked with a women who's partner was a painter, and the first thing they did with new coveralls was mess them up. To appear in pristine new white coveralls, with no paint stains was just not done. Denim is one of those fabrics which has more 'value' when worn in, when a little worn or roughed up or faded. Manufacturers and Designers (not always the same thing) go out of their way to distress or 'pre-wear' denim, so it doesn't look so new, so unworn. This is something that increasingly makes me uncomfortable - distressing, bleaching, sanding, or ripping denim to look 'cool' shortens its life by years and years.
One of my oldest clothing items is a denim jacket, made in New Zealand by Workshop, it looks the same the the one they still sell. I bought it before there were children I my life, way back nearly 30 years ago, at the time it was expensive and a special purchase. It was slightly distressed (something I would avoid now as it shortens the life of garments), and I  have always loved the fit, the long sleeves and the narrow body.
But the problem with long sleeves is the same as the problem with long jeans or trousers - the hem wears out first. At first I didn't mind, I kind of liked the 'this old thing' vibe of the ragged sleeve hems. I wore it with pride, imagining that the wear was kind of a symbol of a favourite jacket and of a slight disregard for conventions around clothing having to be new. As the frayed edge threads got longer and longer, and people started ask if I should trim them, and I realised that while a worn jacket might be 'cute' or 'street' it wasn't very practical, I started to catch the threads on door knobs and other edges.


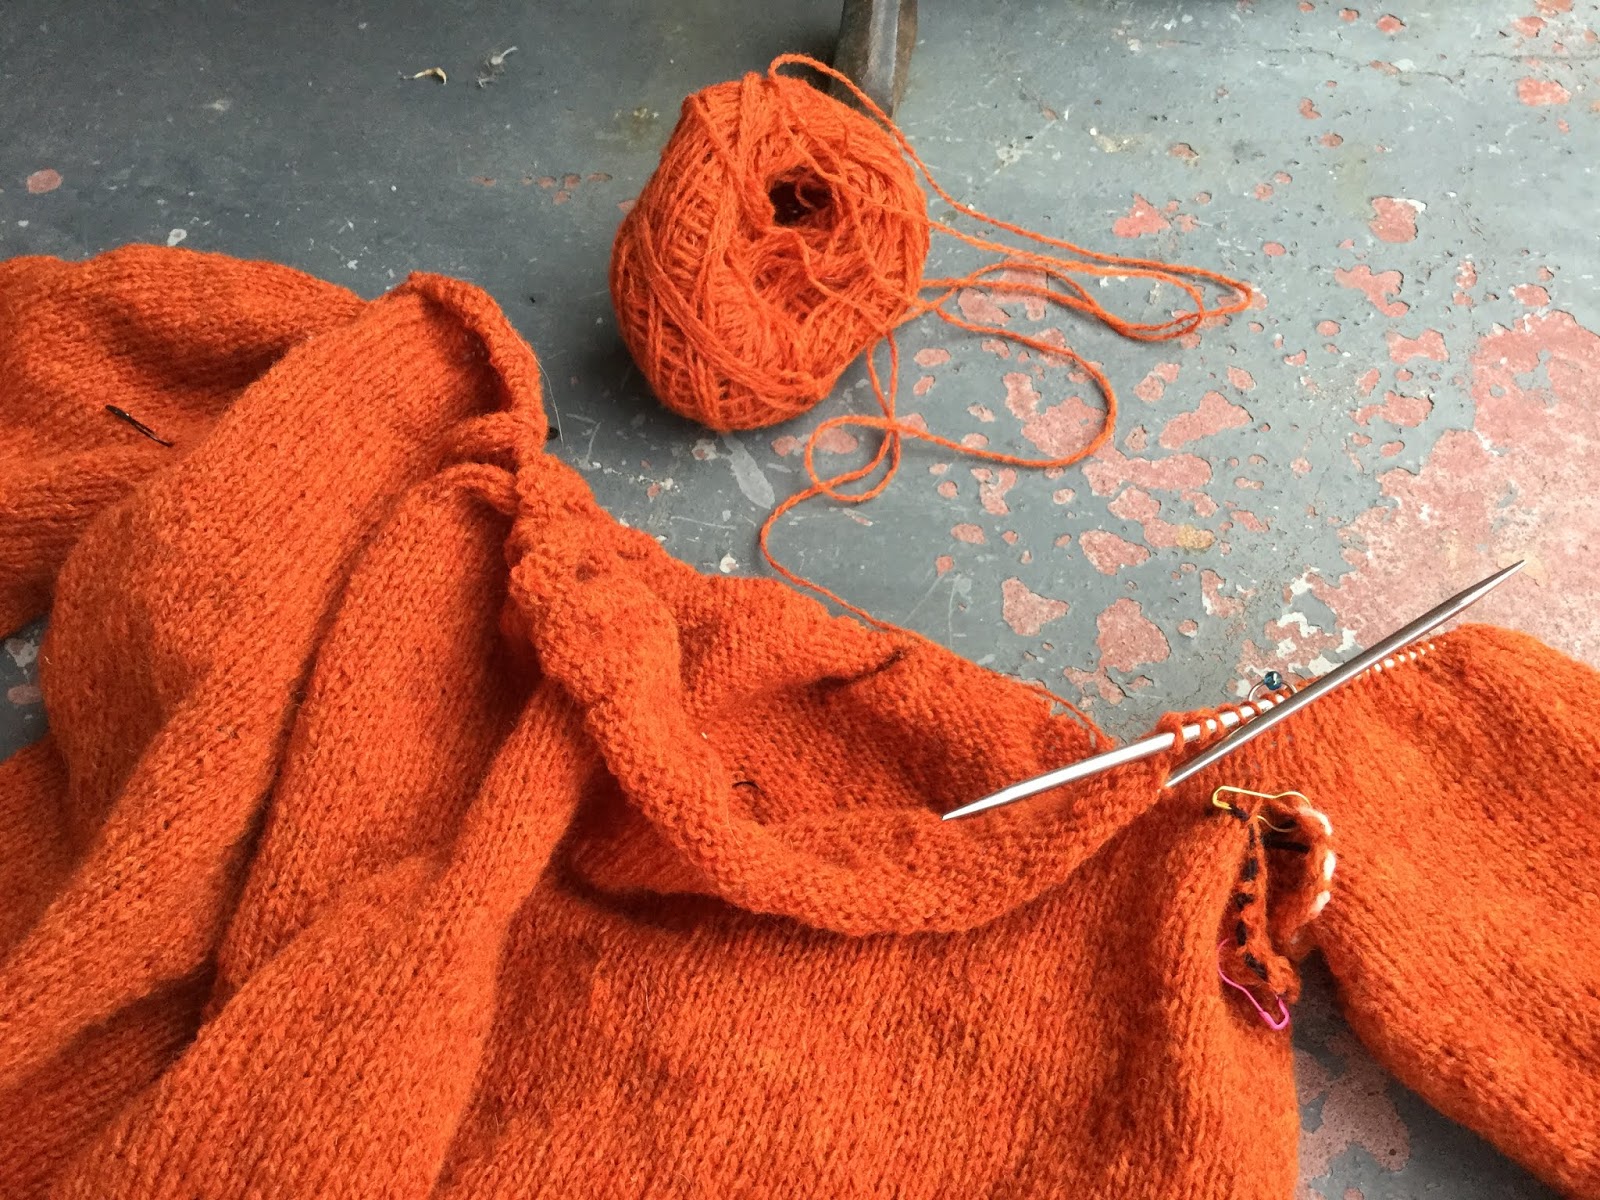
It was time to repair my favourite denim jacket, my only denim jacket. First I trimmed away all the loose threads. This was good as trimming revealed the work that needed to be done. The edge had worn away and the inner and outer cuff were now separate layers. I realised the long threads were the threads that ran around the edge of the cuff -- as the edge warp threads wore away the horizontal weft threads had nothing to hold them in place.


There are traditions of mending all around the world. In my 'work' world I research mending and repair of textiles in New Zealand Museums. My focus period is 1870's to 1950's - kind of arbitrary dates based on when needlework including mending was included in the New Zealand school curriculum. I pair this with research that looks at text books published at the same time - and look at instructions for mending. One of the universal methods is a running stitch mend - it appears in all the books, and is the one I see most in mended textiles in collections. The second most frequent is a patch.  This method is the one that has become popular as people look at and emulate Boro textile repair. The darning samplers I have seen in New Zealand museums usually have the repairs worked in contrast threads, this is so who ever is viewing the sampler can clearly see how the repair was worked. This was twofold, so the teacher and examiners could assess the work-pesonship, and so the owner could use the sampler to remind them how to complete a repair.


I used Japanese Sashiko thread, from Minerva(in Wellington), to reinforce and stitch the cuffs. They don't list it on their website but if you phone them they will happily ship to you. The thread comes in several colours, but I choose to use a soft natural white. It also comes in at least two weights - I went for the finer thread. I could have used machine sewing thread and if I had the stitching would have been less visible. I could have used embroidery thread - but it would have had less twist than the Japanese repair thread.

 The first cuff - I just used the thread to reinforce the edge, the second cuff I added in a layer of folded cotton to even up the edge. This was the right sleeve and was more worn than the left (I'm right handed). Adding the layer of folded fabric between the two cuff layers - meant I had to work the horizontal stitches first.


How did looking at mending samplers in museums and vintage books inform me? Well I knew that the thread had to be kept soft, and not pulled too tight. If I pulled the mending threads too tight the work would become stiff. Keeping the stitches 'soft' allowed the fabric to retain its soft flexible fabric qualities.


The finished cuffs look mended, but that is ok, the jacket is 30 years old, it looks far more used and worn than any new garment would. Replacing the cuffs would have taken much more work and looked odd with the vintage fabric of the jacket.


The final cuffs are mended, and I can't wait to wash the jacket so the threads blend into the fabric more. Except my learning about sustainble fashion and the 'cost of fashion' informs me that laundry is one of the major ways to wear out textiles - we have been encouraged to over clean and wash our textiles far more than they need to be. There is some evidence that 80% of the environmental cost of a garment lies with a consumer - in the laundry  practices they use. I discuss this with my students - that as designers they may only be able to make decisions that affect 20% of the environmental cost of a garment. There is quite a bit of noise around how 'Fashion' is unsustainable - and most of it points fingers at manufacturers and designers - very little highlights the role customers have in caring for their garments. I will wash this jacket - when it is dirty, too dirty for a brush or an airing to deal with.  I did use my iron to steam the mend - knowing that the thread and fabric would puff up and relax and just look a bit more integrated.

Na Stella

Friday, November 22, 2019

Towards the end

I can't believe it is November 2019 already, I began this year with the intention of doing more blogging, of returning to the weekly or even bi-weekly posting to this blog as I used to do. It has been a busy year, with lots on - and my aims remain just that, aims. That said there are a few updates, things that are blog worthy. I have a new pattern out, and I'm weaving a little more, and I have some writing published in a book by Te Papa Press.

The Art and Science project I was working on back in August was finished, and exhibited and is now a pattern uploaded to Ravelry.
 The Exhibition catalogue is here, and contains images of the works in the exhibition. The image I used was a progress image, a developmental image. At the time the catalogue went into pre-print set up I just hadn't enough of the final project completed to use it in the catalogue.  The pattern is here, and sets out the background to the project. I collaborated with Prof Craig Marshall, of the University of Otago. Craigs interest was in the way biological matter changes the structure and formation of ice. I went with the term Dirty Ice - but its more complex than that, its about scale and structure and repetition - and I tried to capture those ideas in a modified lace.


The final pattern is for a double layer lace cowl, the lace shifts from a larger triangular structure that repeats over six stitches into a medium lace structure that repeats over four stitches,  to an even tighter version that repeats over four stitches. The goal was to transition - and I found a solution that used both fewer stitches (so a closer spacing) and also different sized holes. Some used double yarn overs to create four stitches, others used double yarn overs to create two stitches, and the lasts used a single yarn over to create two stitches. The transitions  need to be fluid - I couldn't just switch between the two laces - I needed to find a way to merge them together over so they blended and morphed the way the structure of ice did. The lace also had to be triangular - as I learned ice was. It felt like breaking the rules - but also like I was beginning to understand this lace knitting just a little bit more. What was really exciting was the number of comments on the pattern - and that within the first few months several projects have appeared. In my other world, my work world, I write my research up into papers, and publish them. One of the ways we 'measure' the success of our publications, is in citations - how many times other people use 'our' work in their work. I'd like to think that having a pattern worked by another knitter is a little bit like being cited. And in a follow up I have signed up to take part in 2020 - meaning the opportunity for another collaborative project.

I'v  also been weaving, this is the latest batch of dish towels on the loom, a 12/2 cotton, in a colour called Pompeii Dust, alongside a black and dark blue. This was a challenging set up, finer than anything I have woven before except for that really fine 22/2 cotton sampler I mistakenly set up in 2014. At that stage I was brand new to weaving and didn't want to weave the kinds of thick home made chunky weaving that weavers seemed to do. I wanted to weave finer cloth. What I learned at the time was that weaving fine cloth is fun, and pretty impressive but involves lots of fiddly work to set up. Mistakes rather than being invisible are harder to find and trickier to fix. That little adventure taught me to approach fine weaving slowly. I have now made a few things in 10/2 and 8/2 cotton, and this is my first 12/2 cotton. Finer means more threads per inch, and so more chances to make mistakes and so more to potentially need to fix. The fabric that curves over the breast beam was woven by a visiting student - someone who has invested in his own loom - I invited him up to see how a floor loom worked - to motive him to put his together. His is second hand will need some assembly and set up.

This is probably my big news this week - something I wrote is in a book, a book on New Zealand Crafting. A few years back Damion Skinner held a series of workshops around New Zealand - inviting people to workshop and discus  what craft was, what craft meant and what craft could be. We were asked to develop a definition of Craft that worked for makers, for owners, for curators and for theorists - it was hard. The workshops were funded by Creative New Zealand.  Following the workshops people were asked to contribute to a book to be published.


The article is short, but hopefully clear to people who want to read about craft and craft education. One of the areas I research is how people were taught about mending. I was curious why people were not teaching mending any more - and I know it is tied up in the rise of consumer culture and of mass production. I suspect that decades of teaching mending as a virtue beget a culture that wanted to avoid mending at all costs, That never having to mend again was the very real outcome of making young people learn how to mend and telling them it was their 'lot in life'. Those children who had learned to mend at school were then exposed to a huge amount of marketing of consumer goods, including textiles. To see if my ideas were right meant a wee bit of work, looking at legislation, looking at samplers in museums, and looking at articles on teaching and learning needlework. Some of the content is available digitally - here. This year the work has progressed a little more with a visit to the Auckland War Memorial Museum, and a planned visit to Te Papa in a few weeks. Those visits were to capture data on mends done to domestic textiles in the 20th Century. At some point I think I may have to work my own mending sampler ...

So that is that, well nearly, I may have another loom and I might be in the process of doing some other weaving. More next week (promise).

na Stella

Sunday, August 25, 2019

There has been knitting, and there has been frogging

Yes, frogging, and mending, and knitting. There is even more weaving being set up. Truth be told, there is more knitting since the last blog post than a single post can cover - so today its just highlights and onward.
My AfterParty sweater is done, all finished, and was in time for the Christchurch Mid Winter Wool Feast in June. I do like this very much, the body is boxy, wide, and the sleeves narrow - it is one garment that receives multiple comments every time I wear it. Several people call it 'cute' which is kind of nice given I am now in my 50's and cute seems to belong to a distant past.  I would very much knit another of these. Maybe in some yarn that is more local?
 And with one sweater done, another was began. This time in lace-weight 2 ply yarn. Ad again a direct copy of one knit by someone who's style I admire, Julia, hers is in orange - mine in grey. I am Knitting BlueBell, Published by Jamieson & Smith, in their yarn. The pattern, and Julia, have this sweater knit in flat, but I have converted this to be knit in the round. I am playing fast and loose with gauge - no gauge swatch and I think is is knitting to size - when I hold it against me it feels ok - if not maybe smaller cub who is nearly my height but finer built might get it. The only tricky part has been centering the pattern repeats on the yoke, between the raglan lines. After a bit of thinking and a few false starts I simply counted the stitches - subtracted  as many stitches as I could for complete pattern repeats as I could and divided the remaining stitch count by 2 - placing half evenly on each side of the pattern repeats. I have worked those edges in checker board or part pattern repeats - depending on what feels best. Checker board if only a few stitches, part pattern repeats if nearly an entire repeat.
I am loving the yarn in the yoke colourwork, it is a soft pale blue green - with hints of pink and purple.
There has also been mending - next to the red darn, is the word Fix - in gold. These are commercial socks, pure merino. And they are soft and warm and fit nicely inside boots that hand knit socks are too bulky to fit into. But - 100% Merino is pretty fragile, and these are wearing thin in the wear spots, toe tips and the one on the top that caught on something. Occasionally it is nice to be reminded of the easy care and durable materials we have available to us.
And the last project is an Art Project, destined to be part of the Art and Science exhbition. A lace cowl designed in collaboration with a biochemist at the University of Otago. the lace is based on the lace used in Caparison by Vintage Purls, but morphs as it travels up the cowl to mimic the way contaminants in ice affect the crystal formation. Working how how to replicate that visually in hand knitted lace has challenged me and made me think about lace and repeats and stitch counts and transitions.
 There was much swatching, initially I thought the lace could be knitted in a long colour run yarn. The shift in colours was to signal a change in lace pattern - and there was much swatching and testing to see how that could work. What I didn't think through was how a singles yarn would bias as it was knitted making the swatch twist. That was a cool effect but not quite right for this project.
 After that I switched to using a plied yarn, and worked the developing laces a little more - playing with how many rows between the lace pattern rows,  how much to offset and how to seamlessly repeat these around a tube for a cowl.
And the mini tube - biased lace - I do like this version, its far more organic but not quite right for this project.

na Stella

Sunday, May 26, 2019

Those people, who came before and were weavers, they were clever.

The weavers who came before me, they were clever. They worked out ways to do things that work. Some times, those of us who come later, who come late to doing things, the next generation or the later generations think we understand - but usually then find that the ways of the 'old people' work better than we expect. Today I have an update on weaving - still not weaving, and on knitting, which is actually knitting.
 First up is the knitting, I have reached that moment in bottom up knitting where the sleeves are introduced to the body. Knitting in the round has lots of benefits, like being able to try it as it is  knit, no seams to sew, and for some patterns being able to mindlessly knit around and around instead of working back wards and forwards.
There are also some awkward moments with knitting in the round. Just after adding the sleeves to the body - there is a weird awkward stage where the top of the sleeves are constrained by the shortness of the underarm section - it really takes knitting for 2-3 cm's  with a variation of magic loop before true knitting in the round can be done. The fun part of this is about to start - working a full yoke in colour work. Unfortunately I have another project that needs attention, so this will proceed slowly almost as a treat for working on the 'things that have a deadline'.
 And the weaving, well I warped front to back,  so sleyed the reed/beater first. The instructions generally are to 'rough sley' - in an approximation of the final distribution across the reed. Usually in a pattern of paired yarns - and then thread the heddles, then re-slay the reed with the final distribution. I say distributions as there is seldom one thread in each slot of the reed - usually there is a distribution pattern like 2/2/3 threads in the reed slots.  This sleying twice eemed like an unnecessary step so I sleyed with the final distribution - in my case 2/3 in a 12 dent reed for a final sett of 30 epi.
I transferred the cross to behind the reed and threaded the heddles. Then tied the warp to the back beam and wound it on. Then I tied the warp to the front beam. And tested the treddles - and found several - well more than several threads were twisted at the reed. It happens, well with 600 threads and several operations it is likely that  some might jump over their neighbors as the threading is worked. I spent a good 10-15 minutes sorting the threads in the first inch of the warp - before deciding that those weavers who came before me - the ones who resleyed the reed - they actually had a point. So I untied the warp from the front beam - and pulled the bouts of warp out of the reed - securing each inch bout in a slip knot.
 Then working from the right to the left I re-sleyed the reed. All the time i thought how clever those weavers were - the ones who had not only worked out how to do this complicated thing - installing 600+ warp threads on a loom in pattern - but had shared their working method of how to do it. This took a little over an hour - but was much quicker than finding and fixing all the odd twisted errors. By this time it was too dark to see in daylight - even though it was only 5pm - I needed the extra punch of the desk lamp to help me.
 Then I had a magic moment, I settled myself on the floor with my draft diagram all ready to retie up the treddles for the new pattern. What I discovered was the lift for this draft was identical to the lift for the previous project - so I was all set to go. I was a bit lazy and wove the header inch using the 8/2 cotton from the last project that was already on the shuttle (this project is thinner 12/2 cotton).

Finally I checked the shed - and with no twisted threads and with no change to the tie up of the treddles it was clear. The end threads are my pair of floating selvedges so will sit in the middle of the open shed. Once I wind the cloth over the cloth beam I think i will get a better shed - that is something I might play a little with. Adjusting the treddle tie up to see if the shed can be larger. This is the second project with Texsolve - and it does make me more inclined to play.
I think I need to check the threading - there might be a few places where it isn't quite right. That will have to wait until the weekend I think.  A bit disappointing but something I suspected. I hope it is a straightforward fix - but if not most redos are quick as the how has already been worked out.

na Stella

Sunday, May 19, 2019

Hello again

I have been knitting and setting up the next weaving project. My Afterparty sweater/jersey/jumper* is coming along nicely, I am into the third sleeve. Yes three - the first sleeve didn't quite follow the rate of increases, I had worked the increases every 5 instead of every 6 rounds. So I frogged back to the beginning of the increases and worked it again. This morning I joined up with James, and J - all three of us gathered at James house to watch the final of Eurovision Song Quest. I rediscovered it last year - and decided to make a point of watching again - just like we did as kids when it was televised. Of course New Zealand isn't European and has no way to enter (unlike Australia!). That little jaunt made for nearly four hours of straight knitting time on a Sunday morning - which is nearly 1/3 of a sleeve. And the winner - lets just say it wasn't my pick - but I'm not officially European (so don't get a vote) and the final show as pretty light spectacular fantastic!

The loom is part-way dressed, I successfully moved the cross from in front of the reed to behind it - a little bit of magic that completely confused Bear who was helping.  This link provided really clear instructions, and it was kind of magic, turn lease stick,  pull warpk insert new lease stick and voila! Transferred.


Saturday I threaded 1/3 of the heddles, and Sunday afternoon managed to get the rest threaded. There are 600 in total - and the pattern repeats over 20 threads - between working in sets of four and checking - it was slow going. This time I am using iWeaveIt, the weaving app for iPad. This has a neat feature that lets you work through threading block by block. I spent the time turning the loom so the best light from the window was over my shoulder - and eventually added a desk lamp so I could work beyond sun set (it is May so dusk falls around 5pm now).
As I began to wind it onto the back beam - I realized that I had missed tying on 4 threads - and now I have to pause and unwind and attach it with the others to the back beam. I cant believe I missed it - and there is nothing to do but fix it and continue carefully. I know that it will be fiddly to fix - as there are also two broken threads to fix and re-thread through the heddles. There is something a little odd about some one like me working on something that requires so much careful managing - I really prefer things that flow craftwise - but once the prep is done - weaving flows.
 Here is the progress shot of the sleeves, at this rate these will be done soon - which means the yoke is next. The yoke on this sweater is colour work - so lots of fun to look forward to.
I liked the proportions of this sweater, a slightly wider boxy body and longer sleeves - and I am hoping this darker burnt orange will fit into my wardrobe of blue and blue grey and black easily.

* sweater/jersey/jumper, I grew up in New Zealand speaking of these garments as jumpers, and perhaps jerseys, but with the leap into online knitting communities the word sweater has joined my vocab. This leaves me a little confused as to what word to use when talking online so I use all three.

Na Stella

Thursday, April 25, 2019

And yes, I have been knitting

Today it is a late post, I have a weeks leave from work and little things like weekend routines tend to slide. But there is knitting,
The knitting is Scottish, Le Petit Lambswool Biches and Bouche, I am shamelessly copying a sweater I saw at Unwind - Afterparty by Astrid Troland. The yarn was a late Unwind 2019 purchase - I told myself I didn't need it, that I had lots of yarn, but  Sunday morning, 3 days in I realized that I would regret not adding the Le Petit Lambswool to my stash. The yarn is not merino or cashmere soft, but is light and soft to touch - more like Shetland yarns only perhaps softer. After party should look good with dark plain dresses and jeans and other wardrobe staples.
As well as knitting on Afterparty (and a few other languishing projects in the WIP basket), I have been playing with my Inklette loom. I've had this for a few years but only recently realized that it was perfect for making matching tapes for hand woven items. This was meant to be a perfect match for the black-white shaded warp that is currently on the Loom. I say meant to be as the idea was good but a little naive.
I knew in theory that the white weft would show on each edge, and that if it matched the warp it would appear invisible. What I failed to understand was that it would show as tiny white blips on the black side of the band. I could have switched the white weft out to a grey - dark or light, but decided to continue to weave the band and use this as practice for my tension. I worked purposefully on this - making sure the white blips were as even as I could make them. I also worked my way through several Inkle forum threads on Ravelry.com, testing advice and suggestions for keeping Inkle selvedges neat and tidy.
What I learned I put into practice on a wider band.  This one has 91 threads, and I have added an Inkle temple. This is a wrap of sturdyt paper taped to a fixed width. Every time I place a weft I change sheds and tug the weft until the band width matches the temple width. This simple little trick (Thank you Inkle weavers Help Desk of Ravelry) is genius. I am not too sure about the orange - but knew the grey/blue/black band needed some sort of bright. Bear asked how wide Inkles could be - I said not much wider than this on the Inklette and asked why.  Seems these have Guitar strap potential - which is one of the classic uses by many weavers. I might have to explore weaving wider  Inkle bands on a floor loom some time soon.
The weaving on the floor loom continues, this is tea towel number 3, in a chevron twill. I still consider myself a beginner weaver, and the inconsistencies in my beating are really clear in this photo. The good news is that washing and tumble drying seems to help even things out. The messy bits just above the orange weft are the anchor pegs  of the Texsolve supporting the lamms. The plan is to place a narrow decorative band in a darker colour 2/3 of the way up the piece.
Over the past week I have tweaked and adjusted the tie-up and now the loom is working nicely.  I've worked out which cords go behind and which in front, and how long each cords should be. There were some adjustments to make as the Texsolv anchor pegs don't fit the the holes in the shafts - but they do work as buttons to hold the cord in place. Some of the lamms didn't work so well with the pegs - they rode so closely together that the pegs would get caught and flick out. of the Texsolve holes.  For those positions I switched to cotter pins, which clamp on the cord and lie very very flat on the top of the lamm. I might have celebrated the loom being in lovely smooth working condition by ordering some loom toys.
 I also dropped into the local library and picked up two books on Inkle weaving.l I have Anne Dicksons weaving on four shafts book and think I will add her Inkle pattern directory to my bookshelf in the near future.
Helen Bress's Inkle weaving book is a little dated - no colour but  sections on how to add sticks and found objects to ones inkle bands.. What I did like is full detailed plans for making both a  table top and floor standing Inkle loom. I don't have immediate plans to build any more looms - but it is nice to know where to find plans.
The sweater, Afterparty, is at the stage of needing sleeves, so that is the next thing to work on. I have been procrasta-weaving at the thought of working two long tubes (sleeves) before the fund colour work of the yoke. The loom is in the room at the far end of the house, and the lighting isn't the best in there so knitting in the living area with nice bright lights is the best choice now the daylight hours are shorter. 
take care
na Stella

Sunday, April 14, 2019

Are we there yet?

So, last week I said I was nearly there, and it seems I jinxed it maybe just a little. I am weaving but there has been a lot of little tweaking between then and now. I should have expected that, I have replaced all the plain nylon cord with Texsolv and knew I would need to spend some time finding the right lengths for each of the cords so it all worked nicely. I also knew that with 580 thread ends, 4 shafts, four upper lams and four lower lams and eight treadles to connect in the right order and with the right distances between them that there were lots of placed to confuse things. That is 297,859 points to connect and 297,859 points to muck up. At some level it is a little like knitting, as a complete garment can contain that number of stitches - all of which need to face the right way and be the same size and in order. In another way - with Weaving, the corrections mostly happen at the start, once things are sorted the actual weaving is simpler.

So ...first I sorted out where I had accidentally crossed threads between the heddles and the reed.
Then I placed a flat stick into the weft, changed the shed and placed another flat stick,  so I could identify where the threads were not in order. It happens - but easily fixed at this stage. a matter of undoing the tie on knot and pulling these gently out and rearranging in the correct order. 
Then it was a case of weaving a little bit - and looking carefully for other errors. Here several set of two threads are twinned, sitting beside each other rather than taking turns - over/under. Again it is a case of gently pulling these out of the weave and sorting them into the right order.
Once  that was sorted - I wove a little more, just to check the threading was right. And then thinking things were good I worked a two-stick header, so I could eliminate the bulky tie on knots. This is something I have seen in Peggy Osterkamp's book and blog. I like it, it is neat and tidy and rather cool. It did seem to waste a bit more yardage- or at least it did in my case as I didn't have the foresight to place this closer to the beginning of the warp. Live, weave and learn.

The last little bit of checking is to make sure the treadles are tied up in the correct order.  Two things need to be 'right' here, that the order is correct for the pattern, when treadle two is depressed - in this case shafts two and four should rise and shafts one and three should fall). The other thing is that the treadles need to be tied up so that the 'shed' or opening created by lifting or lowering the shafts is clean - no stray threads sitting in the middle that could go either way and muck up the pattern. When I started weaving  my pattern, a point twill, - the pattern created was nice - but not the pattern I had planned. It took a wee bit of time sitting on the floor fiddling with the tie up to make sure everything was working together in the way I wanted it to.

Finally, it looked good, the top few rows of pattern are the one I planned. There is one little teeny mistake that I do need to fix. If you look carefully one quarter of the way in from the left of the photo - there is an interruption of the pattern. I think - this involves re-threading two threads and adding an extra thread - but I will sleep on that before I do anything drastic.

And while I did all that, Bear and Frank held hands on the sofa. Truly they did, Frank reached out and quietly with soft paws/no claws made sure he was in contact with Bear... so cute.
na Stella

Sunday, April 07, 2019

Nearly there...

This weekend was a praxis one, putting theory into practice. As part of 'investing' in weaving as a hobby, I have read and re-read different weaving books and blogs on methods of warping but so far I have only warped one way. It was time to try another method - to make sure I was choosing rather than doing the only method I knew. This is probably my 6th or 7th piece of weaving, and all the others have been warped back to front. There seems to be two main schools of warping, Back to Front, one where the warp is distributed using a raddle and wound onto the back beam before being threaded through the heddles, then thru the reed, then tied on to the front beam. Essentially the warp is wound on the back beam and then threaded from back to front of the loom.  The other method is Front to Back, the warp  is installed working from the front to the back of hte loom first it is sleyed through the reed, next threaded through the heddles then tied onto the back and wound onto the back beam.

This is the beginning of my first foray into Front to Back warping. Well actually there was a stage before this where I removed the reed, laid it flat on two supports and threaded the warp evenly across it. I had to find a way of supporting the weight of the warp while I worked - as it was likely to drag itself out of the loom and collapse on the floor. Looping it around my spinning chair worked well. There was a bit of loom ajdustment as removing the reed invovled a bit of a tugg of war - so I sanded and shaved the recess so the reed is a better fit into the beater. This should make it easier and quicker to remove the reed in future.


It seems easiest to work from the centre out so the next stage was to find the centre of the warp, easy in this case - as I have four equal sections of colour, and the middle point is between the second and third colour sections.  Each thread was threaded through the heddles, in  pattern - just a very simple and probably very  old [1-2-3-4-3-2] point twill.

Saturday I   threaded the reed, and manged to get one of the colour sections into the heddles. Sunday I worked a little more on this, and completed out to the edge of the right side. For me the right is always the more awkward side to thread through the heddles - as it means using the threading hook in the left hand ( I am right handed).  It is possible to work from the right side intoward the left - but that involves counting out threads and heddles and being very accurate, for this impatient beginner I find it easier to thread in pattern until I run out of warp.
I discovered that threading the heddles Front to Back is very much more comfortable than sitting at the front. The spacing is just nicer, a more comfortabel reach and height (the back beam is higher than the front on this loom)- that alone is likely to make this my warping method of choice. 

Sunday afternoon Bear helped me wind the warp onto the back beam. My other addition to my weaving kit is 5 meters of screen door mesh. This is my new layer between the warp threads. I love this!  The warp is smooth and it seems so much neater and flater than using warp sticks or wall paper or corrugated card. Corrugated card - oddlly enough would have been more expensive to buy than the door screen mesh. It was a bit tricky to wind on - definalty a two person activity to keep it rolled tight with two hands and to wind the back beam with a third hand. I love how flat and smooth and evenly spread out the warp yarns are.
The next stage was to sort the treadling tie up - to adjust all the cords between the shafts and the upper and lower lamms so that the pattern is correct. This is my first real working play with the texsolv as a tie up system.  It was much faster to shift pegs than it was to adjust the larks head knots on the nylon cord I was using previously. I now have working sheds - that is the warp opens enough to pass a shuttle through - but they could be neater - so over the next few days I will tweak the peg placements until I have it as neat as it can be.   Using two treadles for plain weave, and four for the pattern ... but I will play in iWeave it to see if there are variations to the tie up that I can add in with the last two treadles.
So - end of the weekend and all ready to 'throw' the first weft!
Exciting!
I would have continued but we had a family birthday dinner (Bear's) and it was 5:50pm... we were due at the resturant at 6:30, so I had to push this back to the wall and step away from the loom.

There has been knitting, and there is gardening - but more on those next post.
na Stella