Today I finished knitting the body of the cardigan, and start a sleeve. I explain a simple maths error that any one can make, any-one I tell you, anyone - but which had me questioning my sanity. And I'll explain why last nights knitting will be frogged today. And thank you for so many nice comments on the finished baby blanket. From fellow and very skilled knitters - high praise, and very appreciated. Thank you
Here is the body of my Fannigan. Fannigan is now my working title for this cardigan - I finally found a name. Simply being a matter of Fanna and cardigan rushed together. It is 33.5 cm long, which is .5 longer than planned, but sometimes knitting goes like that. Instead of measuring - I was knitting and wondering if it was long enough. The 10 stitch steek is clearly visable up the centre front. I've been watching the EZ glossary, and she does only a one stitch steek, eek! I thought 3 stitches as per Anna Z was tempting fate - but there it was in living colour on the tv screen. Not only 1 stitch - but only one row of machine stitching down each side of the single steek stitch! I'm not sure how many stitches away from that the sleeve is attached - - but one stitch.
So . . . maths. Lets just say when using the EPS* system you need to know K, which is either the size in cm's or the number of stitches around the chest, once you know the gauge it can be easier to work in the finished measurements for the formula . So I am using EPS to work the shaping and sizing for Fannigan and measured K. Measured flat, so 43 cm across. Taking K as 43cm I worked out the wrist at 25% and the bicep at 40%. I got 10.25 cm and 17cm respectively. I could not understand that, my wrists and biceps were far larger than 10 and 17 cm. I measured and reworked the maths always getting the same result. I knew EZ couldn't be wrong, after all I had used EPS before with success.
It was some time before I twigged that 43cm was half my K not my total K. You would think that teaching pattern-making for 8 years and knowing a New Zealand size 12 has a bust measurement of 87cm, a waist of 69 cm, and a hip of 92 cm - would make me think my K = bust =43cm was not right. I am way past any waif stage, am while not large - I am most certainly solider than in my younger days. 'Mature' is what we call the models who are like me, and reserve 'petite' for the younger slimmer ones when we organise the end of year show. But thats my work head, and I was at home with my knitting head, and obviously there are days that the work information is filed away from the knitting information.
So after coming to my senses - I got to this schematic, and last night cast on for the sleeve hem.
Which brings me to here, I used a German twisted cast on, as recommended by the Zimmerfolk to stop the corrugated ribbing from curling. I worked one row plain green K1P1 rib, and then corrugated in red and green. But I am not happy and tonight I frog. See the little loose red purl bumps, they are to loose, much to loose. I've posted an image of the ribbing at the hip of Fannigan to compare with. It dose take time to get back into the swing of knitting different stitch patterns and corrugated rib is obviously no exception.
So tonight I frog, and cast on again. and tug the purls firmer as I go, I have also been thinking - the first row after the cast on would really look better if it was K1-Green, and K1-red, then the next row in the round switch to the K1-green, P1-red corrugated ribbing.
and I discovered Yarnivale (thank you Cara)- which is like an edited monthly magazine of tutorials and wittings pulled from knit blogs. I'm not sure how to access it direct, and there must be a way to subscribe, but for now I am planning to work my way through this months issue and back issues. What an amazing idea!
*EPS - well that would be Elizabeths percentage system!
A knit blog, mostly about knitting, or thinking about my knitting, i also weave, spin, make books, and draw or paint with water colours, i have dyed yarn and baked, and all of that can end up here.
Tuesday, July 31, 2007
Saturday, July 28, 2007
Back to the blanket - final touches
So today after waving good bye to BIL and very very loud nephew, well he seemed loud, older than my two and much much more boisterous. I sat down amidst the calm and quiet and lined the baby blanket. Today's post is all about that.
Gillian asked me line the blanket with woven fleecy cotton giving two very sensible reasons. First so the baby would not snag the floats with little sharp newborn fingernails, and second so the blanket would have some grip and not slide off in the wee small hours of the night. A real pro at mother-hood I suspect. I realise that my elaborate finishing of the steek is now hidden - but still have not come up with any nicer solution. I could have bound the blanket with the fleecy cotton, but it would have been bulky and probably suffered from 'differential shrinkage'* between the cotton and the wool and puckered.
I cut a lining in fleecy brushed cotton, about 6 cm larger than the fair isle centre section of the blanket. Then I pressed under just over a cm to neaten the edges and than about a 4 hem to make the lining sized to sit inside the ridge of the blanket edgeing. I mitred the corners and machine stitched the hem in place close to the fold line.
I pinned the blanket together at the corners, and evened out any extra length along the edges with pins. I suspect the edges have stretched somewhat with working the facing. Then I used a double strand of machine stitching thread, and mattress stitch or ladder stitched the lining to the 'bump' of the facing edge. A gentle tug and it pulled neatly into place. I used quite long stitches, as I wanted to keep the blanket edge flexible not pulled tight and stiff.
I pinned and worked each edge in turn, until meeting back up at the beginning. When finished you can just see the stitches, so the lining could be removed once the baby has grown. It does make the blanket almost quilted, much thicker and warmer. I have toyed with using a few lazy daisy stitches in the left over yarn to secure the backing to the blanket - but do worry they will snag the yarn floats.
and I just have to celebrate the i-cord edging with you, it works so well, such a resolved finish. I am very happy to know about that technique.
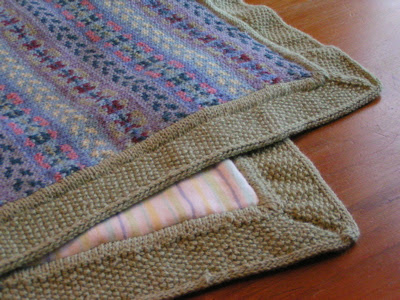
and here is a view of the right side and 'other' side corner - there is no way I could call this the wrong side. Delivery to Gillian is August 9-11th some time, and Baby is expected a week or so latter. I hemmed the left over fleecy cotton to make a matching wrap/sheet/spill cloth. You can never have to many of those when babies are about.
*Thats my textile scientist side showing - in the use of terms such as 'differential shrinkage'.
Friday, July 27, 2007
Back on track, and a beautiful heel.
So with the blanket out of the way, sorry not yet backed, I'm about to knit again on my fanna inspired silk merino blend caridgan )(gotta come up with a name - how do you name your own stuff?), I've posted the last photo showing where I left off, and so where I will begin, and I've been making some progress on my Pomatomus socks, I've got a very nicely turned heel to show you, Very nice indeed. It could be enought to turn a girls head back to top down socks.
So here is my colour work cardigan, at the very point I left it before begining the baby blanket. I have not knit any more, so this is an old photo.
Tonight or tomorrow I will be back to knitting this one. Two projects at a time to work on - if I impose some limits then I will finish things. With small interuptions occassionally. At present I so want to knit a hat, with pirates and a lavian twisted braid cast on as learned from watching EZ in her Glossary video. but after Pomatomus, Oh and some felted mittens, and a lacy scarf, and a jersey for Chris, so much to knit and so little time ....
I am working my way thru the EZ glossary video - but there has not been much quiet time to sit and watch and knit and I don't know why? Oh yes, work, 34 hours per week of official full time paid away from home and doing stuff other people need work, so my preparing last lecture for the year, all done now, and an writting abstract for another conference - due monday, work. I was at knit nite thursday when Kelly said "Full time - they don't pay me enough to work full time", I replied " they don't pay me enough not to work full time, so how does that work?".
So socks, That Cookie, she is so clever, I am a toe up sock knitter, I like to knit until I run out of yarn, socks usually end up shorter than you think. With the stretching out to go around your leg - what you think is a decent length sock becomes kinda shortish when worn. Toe up socks eliminate any risk of short socks nicely, so I don't often work full gusset heel socks from the top down. Oh - I have in my day knit them but very early on in my sock knitting life, I knit a few, then I discovered short rows, toe up, and latterly on to widdershins, gusset heel flat and toe up. But Cookies turned heel in these is beautiful. Pomatomus has a twisted rib heel flap growing out of the twisted rib of the lace pattern, and a very neat and generous rounded heel cup.
This is the heel cup, so neatly formed. I know it is probably standard stuff and you-all knit something of this beauty all the time, but something about the way the rib continues past the lace, then down the heel, and around and under the sole so seemlessly makes this seem well thought out, well designed in fact. How does it go from rib to plain with a seemless transition, magic methinks. My 'last' lecture was on the Arts and crafts design movement, so I have been thinking about how the 'knowing how to' make stuff influences designing, and in a way for me anyway is part of what makes good design good, and so I have been noticing little things like this heel.
Tuesday, July 24, 2007
Ta da!
Finished, last night cast off, ends of i-cord woven in, currently drying after a quick gentle wash. To add still a soft napped cotton backing so the wee newborn babies nails don't snag the floats across the back. And finished 1 month before the baby is due.
Details
Started : 27th May 2007,
Finished : 24th July 2007,
Needles : 3.25 mm,
Finished size : 63 x 80 cm
(25 x 31 inches),
196 stitches in the round,
40 row repeat based on a caridgan chart from Christina Probert's "knitting in vogue"
Blanket has 7 repeats long, 23 repeats across, plus an extra 8 rows so it would finish on a 'matching' section of chart.
Close up of corners and details next time? and of remaining yarn, there is less than 3 m remaining of the green used for the border - I did cut it very close to the point I measured and found 1 m of this yarn knit up a 8cm i-cord bind off edge, then measured the remaining yarn to check I had enough.
stell
Saturday, July 21, 2007
1 Zimmerman, 2 Zimmerman, 3 Zimmerman, a full house of Zimmerman
Today, not much knitting, a little post about the blanket edging, and some free stuff from work, but today its pretty much all about EZ.
ok, so I am a die-hard Zimmer-fan, a few years ago I discovered EZ, and her books. So after reading the first one, the Almanac, I succumbed and bought all the other ones I could find. A complete set - I had
Then earlier this year I discovered a new Zimmer-book, one that I didn't have. The regular newletters, the wool gatherings all collected up and published. But after nearly 8 years of continuous child care costs, my once economically robust pockets were far to shallow to buy it right away. Then this birthday - Bear asked if he could buy me a book, and the missing Zimmerman was requested. While away - Bear not only ordered the book, but discovered 2 dvd's which he thought I might like. So now I have a full house of Zimmerman.
I was a little surprised at first with the dvd's, I was worried that ten hours of watching an old lady knit (I know - she is THE old lady of knitting, but still an old lady talking about her knitting!), would be to much. That much as a fan of her writing, the act of watching paint dry, sorry knitting would be altogether to much. Well we watched an hour of the knitting glossary on saturday night, and am I hooked. Yes I know - thats like admitting reading a dictionary or encyclopedia is fun, I am a knitting geek, and what is worse I can think of at least 2 knit buddies who will want to borrow the dvd's. I just thought of my ez joke, when I get old I'll have a Zimmer-frame!
She is as current and dry and informative and practical in videos as in the books. And I watched 2.5 hours of the knitting workshop dvd on sunday morning and actually got to the bottom of the ironing pile! Well past all the stuff that you don't like or need so pretend to leave for the next ironing session. Who knew - watching knitting would be fun, and productive! And learning, did I learn new things, the finer points of knitting, things like how to actually do that hanging cast off, that the drawings make look like a regular cast off. How to do a Latvian braided cast on. Oh, and that my so called 'finish' purl is how EZ purled, but not at all how her daughter Meg purls. And I only got up to the C's. Just think whats left to discover!
Ok - so thats enough about new books and watching knitting videos, here is the edge on the baby blanket. I could only get one more ball of yarn in the same colour and batch, so the moss stitch edge isa little shy of 5cm. I though long and hard about the cast off edge and had planned a ribbed cast off, you know - k1,*p1, pass knit stitch over, k1, pass purl stitch over* repeat. But then tried a 3 stitch i-cord bind off, I thought it might be to bulky but no it wasn't. I cast on 3 extra stitches, *k2, ssk, slip 3 back onto left hand needle* - repeat. And it is perfect! Perfect I tell you, just perfect. The i-cord repeats the slight bump of the facings enclosing the steeks, and it is far more resolved than an ordinary bind off. I just hope I have enough yarn to go around ... cross fingers with me please. I have put an extra 3 rows of i-cord with no ssk in the corner, and that seems to make a nice sharpish point.
And here is the close up of the i-cord, and what I now realise is not moss stitch, but seed stitch. Moss stitch has the knits and purls repeated for two rows, and seed stitch they reverse every row.
And these, well they were used at work, to hold things for the knitting machines. And were about to be put in the skip as rubbish. How could I let that happen. These have a lovely 1950's "popular mechanics quality", all solid mdf and practial drawer and shelf storage-ness, with big solid castors. I asked if i could have them, promised to pay and was told just to take them. And so they are now installed in the kids rooms as portable toy storage. Look we have baby doll with her bath and bed bits together with a wooden house building system called woody click underneath. And Toby has construction toys of various types, Thunderbirds, transformers, lego, bionicals, kinex, and mobilo - all the building sets a boy of 8 could want in one place and so portable.
I had intended these storage units to be passed on to my Dad, who is a retired mechanic. So 'retired' in fact that he has collected around 12 vintage rotary hoes, and 5 vintage tractors, and built several large barn/garages to house them. I thought he would have much use for these, but then the kids saw them and there was no giving them away. Especially when they realised they could sit in them and have 'rides' around the house. Still the theory is that they can easily cart toys to either lounge and just as easily tidy up. Theories, so nice theories - they give us hope.
ok, so I am a die-hard Zimmer-fan, a few years ago I discovered EZ, and her books. So after reading the first one, the Almanac, I succumbed and bought all the other ones I could find. A complete set - I had
- Knitters almanc
- Knitting workshop
- Knitting without tears
- Knitting around
Then earlier this year I discovered a new Zimmer-book, one that I didn't have. The regular newletters, the wool gatherings all collected up and published. But after nearly 8 years of continuous child care costs, my once economically robust pockets were far to shallow to buy it right away. Then this birthday - Bear asked if he could buy me a book, and the missing Zimmerman was requested. While away - Bear not only ordered the book, but discovered 2 dvd's which he thought I might like. So now I have a full house of Zimmerman.
I was a little surprised at first with the dvd's, I was worried that ten hours of watching an old lady knit (I know - she is THE old lady of knitting, but still an old lady talking about her knitting!), would be to much. That much as a fan of her writing, the act of watching paint dry, sorry knitting would be altogether to much. Well we watched an hour of the knitting glossary on saturday night, and am I hooked. Yes I know - thats like admitting reading a dictionary or encyclopedia is fun, I am a knitting geek, and what is worse I can think of at least 2 knit buddies who will want to borrow the dvd's. I just thought of my ez joke, when I get old I'll have a Zimmer-frame!
She is as current and dry and informative and practical in videos as in the books. And I watched 2.5 hours of the knitting workshop dvd on sunday morning and actually got to the bottom of the ironing pile! Well past all the stuff that you don't like or need so pretend to leave for the next ironing session. Who knew - watching knitting would be fun, and productive! And learning, did I learn new things, the finer points of knitting, things like how to actually do that hanging cast off, that the drawings make look like a regular cast off. How to do a Latvian braided cast on. Oh, and that my so called 'finish' purl is how EZ purled, but not at all how her daughter Meg purls. And I only got up to the C's. Just think whats left to discover!
Ok - so thats enough about new books and watching knitting videos, here is the edge on the baby blanket. I could only get one more ball of yarn in the same colour and batch, so the moss stitch edge isa little shy of 5cm. I though long and hard about the cast off edge and had planned a ribbed cast off, you know - k1,*p1, pass knit stitch over, k1, pass purl stitch over* repeat. But then tried a 3 stitch i-cord bind off, I thought it might be to bulky but no it wasn't. I cast on 3 extra stitches, *k2, ssk, slip 3 back onto left hand needle* - repeat. And it is perfect! Perfect I tell you, just perfect. The i-cord repeats the slight bump of the facings enclosing the steeks, and it is far more resolved than an ordinary bind off. I just hope I have enough yarn to go around ... cross fingers with me please. I have put an extra 3 rows of i-cord with no ssk in the corner, and that seems to make a nice sharpish point.
And here is the close up of the i-cord, and what I now realise is not moss stitch, but seed stitch. Moss stitch has the knits and purls repeated for two rows, and seed stitch they reverse every row.
And these, well they were used at work, to hold things for the knitting machines. And were about to be put in the skip as rubbish. How could I let that happen. These have a lovely 1950's "popular mechanics quality", all solid mdf and practial drawer and shelf storage-ness, with big solid castors. I asked if i could have them, promised to pay and was told just to take them. And so they are now installed in the kids rooms as portable toy storage. Look we have baby doll with her bath and bed bits together with a wooden house building system called woody click underneath. And Toby has construction toys of various types, Thunderbirds, transformers, lego, bionicals, kinex, and mobilo - all the building sets a boy of 8 could want in one place and so portable.
I had intended these storage units to be passed on to my Dad, who is a retired mechanic. So 'retired' in fact that he has collected around 12 vintage rotary hoes, and 5 vintage tractors, and built several large barn/garages to house them. I thought he would have much use for these, but then the kids saw them and there was no giving them away. Especially when they realised they could sit in them and have 'rides' around the house. Still the theory is that they can easily cart toys to either lounge and just as easily tidy up. Theories, so nice theories - they give us hope.
Thursday, July 19, 2007
so after the steek, whats next ?
Today - after I and some readers had recovered from steeking, here is the flat un-edged blanket. I did have some comments on how scary it was, especially in email from Gillian. I also felt challenged by a suggestion to knit the facing in checkerboard garter stitch! Thanks Marina, it probably would look good, but I am not quite ready for that yet. Maybe on a smaller blanket? So this post is a quick review of how I went about the faced edging to cover the steeked cut edges, and do the same for the cast on and cast off edges to keep it all matching. Work has been very busy, our 3rd year students started back, and straight into their major project, lots to set up and have ready, and it seemed there were 65 million emails to go thru after taking 2 weeks away from work. Plus a new work laptop tablet so 2 nights gone in making it talk to the wireless, and setting it up 'just so' and a night lost to a parental school committee meeting. So the blanket edge is all that got done since the last post.
But this is a knitting blog so here the knitting update.
I picked up 960 stitches around the edge of the blanket, I kid you not - 960, just to be clear that was nine hundred and sixty. That is 3 for every 4 rows down the sides, and one for each stitch across the top and bottom, and that, my friends is 960! I worked 5 rows in stst in the round, using paired increases every 2nd row and put those stitches on hold. Then I picked up matching stitches from the wrong side, picking up the green yarn on the reverse, and knitting a matching facing, same number of rows and same increases. You can see the steeked edge peeking out from between the edge facings. I had almost every small circular I own in use, I knitted on the 3.25mm ones, but used the smaller 2.5, 2.75 and 3mm ones to hold stitches on edges i wasn't working on. There was lots of sliding stitches from one to the other so my 'working needles' were the right size.
Then the -making two stitches become 1 row, I knit as if doing a three needle bind off - but didn't cast off. This neatly sandwiched the cut and cast off edges between the two facings, and concealed them amazingly well.
These last two images show a few working rows of the moss stitch. Here we have the right side,
and here the wrong side
so now there is just a 3-4 cm's to knit to complete the facing, in moss stitch, so it stays nice and flat. I'm off to get more yarn tomorrow, between the farmers market and the swimming lessons ... and post again soon.
Saturday, July 14, 2007
Take sharp scissors and cut carefully between the two columns of knitted stitches
Which is how all steek intructions go.
So today - I prepare and cut that steek, and we have both photos and a video of the steek cutting.
Video here :
Steeking - enough to make many a knitters blood run cold. Gillian - if you are reading this, just skip the next few sentences - they might bring you some un-needed worry in your last trimester. The blanket is fine, and nearly ready for that baby. This is when I admit that this is only my 2nd ever steek, Well perhaps my third. The first may count as 2, there were two sleeves steeked into two armholes.
Oh, I've read lots about steeking, on line and in books, and I fully understand the principles, and it don't scare me (much), but I have not cut many steeks in my time. I do plan to steek more.
First I flipped the work inside out, and tugged each loose yarn tail, making sure all the knitted stitches were tight, and not pulled open. I had already undone all the knots I put in earlier as they were creating bulk and distortion.
Then I whipped the right leg of the centre steek stitch to the leg of the stitch next to it, and then did the same for the left leg of that centre stitch. Funny how it shows up more clearly at a distance than up close. This technique was described to me by Knitasha at KR, thus :"Make your steek 3 stitches wide -- no wider.
With a tapestry needle and yarn, whip-stitch the right leg of each center stitch to the left leg of the adjacent stitch. Do this all the way up the steek. Begin again, whipping the left leg of the center stitches to the right legs of the adjacent stitches.
When you are finished, there will be a one-stitch ladder running between two rows of whip-stitching. Cut the ladder."
I added a row of machine stitching - just to be on the safe side, as with two colours in most rows - well I wasn't sure of catching all the yarns tightly. I machine stitched a line of stitching down the outside edge of the steek stitches.
And using small surgical scissors, I cut neatly between the lines of whipped stitches. Trimmed away all the ends, and gave the work a quick gentle press.
So - this is the finished edge - pretty neat huh?
... and those yarn tails, well there is no weaving in with this technique, and so here they are, a little messy pile on the table before a last trip to the bin.
And finishing the blanket, last night I picked up un 100's (felt more like 1000's!) of stitches around the edge, and now am working a plain 3-4 row stocking stitch band. Then I plan to pick up a inside facing, and work the same lenth before knitting the pairs of stitches together and ---- oh, I was thinking ribbing, because it wont curl, but now I'm wondering about seed stitch, or moss stitch. I'll let you know soon. Or suggestions please?
[added 16th sept - I completed the blanket by adding a double facing to enclose the raw edges, then a wide moss stitch boarder finished with an i-cord bind off. the mother requested I line the back with a napped fleecy cotton lining. The baby arrived on time (no, not mine), a wee boy, Toby, so the blanket is keeping him warm and snug in another city. stella ]
Friday, July 13, 2007
Always read the pattern before packing for travel
Today I tell you about the mistake I made packing for my recent travel to Australia, show off my new mini-project, and tell you what I'm doing tomorrow with the baby blanket (hint - it involves scissors!). And that paper presentation - well it went fine, and people actually came into the room to add to the small crowd and listen - which is much better than people leaving.
When knitting Pomatomus, If you just shove your current knit kit into your luggage you may find yourself knitting Pomatomus, on the four needles as instructed, and in deep trouble with no fifth needle when needed. I missed the sentence that said " Though 5 needles are required" and remembered only the bit that said "only 4 of them will be used for most of the sock". Being a tidy soul, I had only read the beginning of the pattern, and carefully stored the 5th needle away in my needle case.
In Sydney I completed the leg section using the four needles as in the pattern, then knit the heel flap, on 3 needles (2 in use and 1 holding stitches), then I got to the written instructions to use all 5 needles - and silently, quietly inside my hotel room I screamed, knowing, that there was no hope of finding any 2.25 mm sharp pointy object to substitute anywhere in the room or in my bags.
Yes - yes I know a clever resourceful knitter would work out how to continue to knit on the 4 needles she had, but after a full day of conference presentations, my wee brain was all worn out from absorbing lots of new ideas. And I was using little needles, 5" ones, so there really was not room to fit all the gusset stitches to be picked up. And really I just wanted to knit, brain dead, simple follow instructions type knitting. So I parked sock one on a loop of yarn - at the heel flap stage and began sock II. I'm amazed it took several weeks to knit the leg of sock one - and only 2 nights to knit the leg of sock two.
Which brings me to image 1, showing how far I got with no t.v. t distract me and lots of evening time to knit. And the second image, with the twisted rib of the heel flap. There was some frogging of sock one while away - wouldn't really be me knitting if there wasn't would it? I had stopped and started the third lace repeat so often I lost my way, several time - but got there in the end.
And this is my miniature gansey sample. I flew back on Thursday, went to work on friday only to be rung by an administrator at around 3, who aplogised for bothering me on my break. Yes thats right, I was actually on annual leave on Friday - but went to work - well I guess it all evens out in the end. And on Saturday - well it was another of the local spinners and weavers knitting workshops. This one was on making a miniature gansey - for a teddy bear. We knit and talked from 11-2 ish, and fitted lunch in there somewhere. This 'class' is very informal, we meet in a church hall, and pay $2 for our share of heating and hot water for tea and coffee. Nothing more - How can i ignore such an opportunity to learn more about knitting?
The 'class' is over two sessions, the next in a month. So today we cast on the front and back bands, joined them, and knit a plain band with an initial. Most of the group knit their own initial, but knowing the sweater was destined for Curley bear - mine has a C. We are to get to the end of the underarm gusset before the next class - I have just started so should be ready. The initial was initially in garter stitch, but the uprights of the letter folded clear away from sight. So I tinked them down and picked them up as garter - but in hindsight moss or seed stitch would be better - and was I think recommended. The yarn is the naturally coloured yarn, the same I knit the clogs in. The Gansey is knit on 3.75mm dpns.
And the blanket? Tonight I whipped the legs of the steek stitches together, tomorrow I plan to machine stitch and cut. Don't worry - there will be photos, lots of photos. Then I will pick up the edge stitches and knit the facing. I am tending towards a single rib, but with a base of double knitting sandwiching and hiding the steek and end edges inside.
Friday, July 06, 2007
Again with those yarn ends ....
....just because they are still there. Today its all about the baby blanket, so I have another picture showing all those yarn ends. In this view - the blanket tube is inside out - so you can see the floats. I've resolved where to end so it pairs up with the start - that just leaves when to end. And I'm away to a conference tomorrow - back Thursday. I'll be here, and presenting my first international conference paper, and on my 41st birthday - lets just say I take a while to get to some things, that others do earlier in their lives. The Blog will be on hold while I am away, and Bear will be solo parenting. My take away knitting will be a sock, the Pomatomus, of course.
You can see the blanket is now around 27 inches or 69 cm. Gillian - my out of town knit sponsor on this project (Hello Gill :D ), is having a wee think about how long it should be. Gill will let me know some time this week. And here is the blanket, again on the living room fireside chair. If you look carefully - you can see a light dusting of snow outside, again. We have been having a few of those wintery blasts, and I have seen more snow falls this winter than the previous 5 winters all together. It was -0.7C this morning, thats around 29F. Outside.
So here is the begining of the blanket,
And here is the end, I had what I still think is a bright idea to make the ends more 'matchy'. There is a band of pale blue with a stepped dark blue pattern. First it steps to the right - then it steps to the left (Rocky Horror any one?). Technically it is the start of the pattern repeat, but I thought if I finished just after that section, the start and end would be the same pattern. Clever - no?
And here is a closer view of one full pattern repeat.
I've got needles to wok the edging coming from Kanagaroo in the Uk, they take off the tax and charge 75 pence shipping per needle set. All the online retailers based in the US retain the tax and charge in excess of $30 shipping - I kid you not! Go and pretend to buy a needle set from some one. For a $14 needle!
So how will the blanket end?
Well depending on how wide the edging is to be. it will either be double and a folded down facing, or single in K1P1 rib. And given how nice the twisted rib on Pomatomus is - very likely to be in twisted rib.
Wish me luck, see you end of the week.
Monday, July 02, 2007
and the clog colour was .... (drum roll please?)
...rusty wine, with a rich deep dark chocolate sole. Can you tell I am writting this while hungry? Today the clog report, the fair isle baby blanket update, I discover finishing the blanket poses some should I/shouldn't I needle purchase questions, and I introduce the large blue folding 'thing' currently taking up a lot of floor space in my small living room.
So back to the clogs, they are not white any more. I was aiming for a deep plum purple - but this rusty grrape is fine. I didn't have any more blue food dye at hand, so this is it. And the dye pot pretty much exhausted, with only a pale blue almost clear liquid left after 12 mins at a bare simmer. The mock stitch effect where I picked knit together the dark sole and the light instep disappeared in the felting and the dying - remember I had wondered if it would remain?
And the verdict, warm soft comfy. I feel like a momma bear padding around the house. But - next time I will knit the small womens not the med womens, even though I have size 9 feet. I wonder if using 9mm not 10mm needles prevented them from felting? But the 9mm were the largest I had. Overall verdict - Will knit again, a size smaller, and probably again, these could be my only slipper in the future.
Fair Isle baby blanket update,
Marina reminded me knotting was fine, that knots have a very valid place in knitting, and I do trust her. There are some 'rules' in knitting about weaving in, no knots and such - and we all know rules are just guidelines that require breaking to achieve wonderful results some times. I also liked Marina's other suggestions - for joining the yarn. What I like about my knitting, is every project teaches me something, either I try something new or I realise that there are different and often better ways to achieve some things. Also I love there are so many wonderful people out there who share their knowledge around - selfishly. I did notice much less change in the background colour of Marina's beautiful colour work - being a novice I seem to have made it more complex than it needed to be.
I am close to finishing, only one more pattern repeat to go, and then the boarder. I have been thinking about what needles I have to knit the boarder with, I have 2 3.25mm circs (Addi turbo of course) and the knitpics, with a 40 inch cable - so could do a sort of a 3 needle version of a 2-circular needle thing. The facing is stocking stitch, so I need to make sure there is no ladder, I could put the junctions at the corners maybe?
Or I could buy a new extra long 2m Addi turbo in 3mm, and knit the facing slightly tighter. I have contacted some on line addi retailers and asked about ETA for the extra long 2m 3mm circ, none seem to be in stock and I don't want to order and have the needle(s) back ordered with a baby due date looming. Would I use this needle again?
Or I could buy two 1m 3.25 circs. I have given this some thought - but have not made any progress as to the 'best' option. I might also ask around and see if I can borrow a long circ, I do know some Dunedin knitters who invested heavily in Addi's for their shawls and lace - could be worth a try.
And this is a christmas prezzie from last December, from me to me. Thats the one way I make sure I get something I really wanted. This is a folding 'shopping' basket from Kathmandu.They have an outlet shop in Dunedin with amazing sales, half price on most ex-season stock. It is huge, holds heaps, and at the moment it is holding my fair isle baby blanket yarn stock. And did I say huge, we have a small lounge and this is parked semi permanently on the floor while I knit the blanket. Usually I use a folding tapestry knit bag with a wooden frame, that is holding Pomatomus right now. And Tapestry has a much smaller foot print.
see? Its big, but great, I just fossick around for the next colour change every row or so and they are so easy to spot in there. Like fish in a barrel? I've also got room to keep the Blanket in progress (BIP?, usually folded flat on top), plus the magnetic chart board, snips, the ball bands, my Pinnochio tape measure, and the swatch.
Subscribe to:
Posts (Atom)