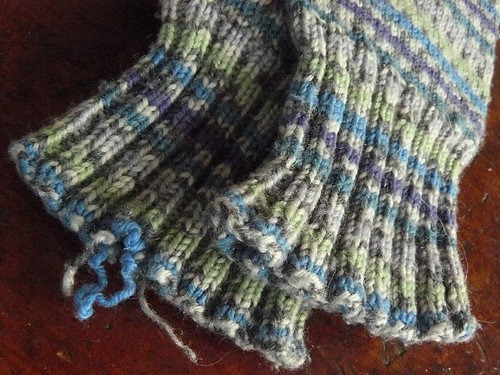
Showing posts with label repair. Show all posts

Monday, December 16, 2013

Refreshed

So ... A month or so ago A left town, a local knitter, who we tempted to the dark side (spinning). Her overseas spell is to be two years ...so she divested. Bread books came my way, yarn, and fiber ... and strictly temporary one of her wheels. I may have hinted that I would be happy to look after it, who wouldn't? Any way the wheel came to live with me, and like many things started a serries of thoughts that spiraled away. I had arranged with A to maintain the wheel, even do a little spinning wheel maintenance, so I did. I worked out that one of the pins was in the wrong hole, and moved it, I changed the drive band cause I like the responsiveness and gentle take up of a finer band. The more I worked on her wheel - the more I grew to appreciate the wheel design. Long story short, I saved a search on Trademe, had them email daily what new listings were put up under the heading spinning wheel ....and there she was, a lovely little lonely Wendy. Trademe is an online auction site, like ebay, and so there was nothing to do but log on near the end time of the auction and bid. A little bit of a frantic flutter and the wheel as mine ... and in Wellington, so my neice collected her on my behalf, and last weekend Bear and elder cub flew to Wellington for a weekend of boys things and to bring back my new old wheel.

Wendy 1969 tired and dusty

This is the wendy as she arrived, faded, tired and dusty - pretty much like all travelers. I had asked the seller if the wheel had one or more bobbins, and they said just one - but look - they didn't recognize the two on the stand as bobbins. Score, three original matching bobbins, and none with splits, chips or breaks.

Tucked away at the side, an orifice hook.

The next surprise was the original orifice hook was still there, tucked away neatly under one of the stored bobbins. Of all the things that get lost as wheels are used, this is often one of them, so the orifice hook being there indicates maybe the wheel had a careful life. The close up shows how dusty Wendy was, the seller had left her as found, with the old yarn leaders, and such - which is way better than over zealous cleaning without knowledge leading to damage and breakages, and wreaking stuff that could be saved.


But, there were some bits that didn't look so promising, much of the metal was dull and brown. Metal can be cleaned, but doing so often involves much work, and the result can be less than 'new looking condition'. Oh well, everything was there, so I knew it would work well, she might just end up looking her age.

So the very next day, my second day of holiday leave, I didn't clean house or do household chores, no surprise there, I set out to refurbish a wheel. I set out a plastic mat, and laid an old worn sheet over the top to catch any drips. My cleaning kit consisted of a box of nitrex black plumers gloves, like surgical gloves but more protection from chemicals, worn green scrubbies (a modern equlivilent of steel wool), a variety of poky things, a soft clean cotton cloth and vintage wheel cleaner/polish. The polish is an old fashioned diy one, equal quantities of turpentine, white vinegar and linseed oil. If you google the mix you will find it is controversial and many report that used over thick varnish or polyurethane creates a sticky tacky build up. Just as many swear it is just the thing to clean and rejuvenate old, dry, wood. I've used it before on vintage wheels and been very happy, although I'd never use it on a modern highly finished wheel.


So the bits that I could remove I did remove, and I gently scrubbed each one with the cleaner polish and the green scrubby. Surprisingly the cleaner polish restored a gleaming shine to the brass, and a duller gleam to any steel, well as the wood.


I workd the cleaner polish with the scrubby over the flier supports, and look - the brown grime went away! I'd love to say it melted away, but no, I had to rub it away, and rub hard, and the ere tricksy fiddly corners and spots that were hard to get at. I cut one old scrubby into strips and pulled it up and over, back and forth, side to side to polish the brown away. I did remove each screw turn, which meant I could slide the metal ring stop away from the steel hoop and that gave me easier cleaning access. Then I replaced the screw and moved to the next one. I knew better than to remove all four at once.


The flier hooks cleaned up a little when I cleaned the flier, much of the brown was gone, or maybe it was just damp and oily so not so visible. Here I couldn't really tug and rub with the scrubby, I was afraid I would snag and bend or break a hook or damage it's seating. So I made use of the dremel, and used one of the soft wire brushes as gently as I could.


That workd and aft a minute or two on apache hook the metal gleamed and was blackened steel just like on my Pipy. What I love about the hooks Mr Poore used was how hard the steel is, I've seen so many Ashfords, Peggy's and others where the act of spinning has cut and worn a groove in the flier hooks, but I've never seen that on the Poore wheels.


Then I turned my attention next to the orifice, and to those favorite stand by tools of many a craftworker, disposable chop sticks and pipe cleaners. I knew having a slight addiction to sushi and stockpiling unused chopsticks were useful vices.


I wound the pipe cleaner around the chopstick, soaked it in the cleaner, and rubbed and pushed and pulled and twirled until the inside was shiny and clean.


Which left the axels, I know from past experience that one thing that slows down old wheels is fiber. Fiber caught around the orrifice, around the flier ends, in the bearings and aroud the wheel axel. In fact - fiber finds its way into all sorts of spaces of a wheel when you use it, the oild helps it stick, and as you use the wheel the fiber tightens and winds around the turning bits. I used a long needle, the kind that is sold for sewing on toy eyes to poke around all the spaces fiber likes to hide, and as I couldn't see shiny metal I suspected there was fiber wrapped around the joint. There was, I managed to free up one end, so I kept working until the feel of metal needle on metal axel told me that there was no more fiber there.


It's not a lot, but enough to make a wheel drag, this is the yarn and fiber I recovered from the axel. The other tool I tried was a dental pick, the kind dentists use, but it didn't reach far enough, and flossing with a pipe cleaner but seemed too soft, brushing the fiber into a soggy mat rather than working it loose. The 6" needle was best,the cork is the point protector ... without that protecting the point I'd do more damage reaching in the drawer to find it.


And finally I worked on the pretty bits, the brass at the base of the footman, with strips of green scrubby, an old tooth brush (I always soak them hot water and toss them I to the cleaning cupboard), and more pipe cleaners. This may have been the bit that was the most fiddly, probably as I could see the unpolished brass bits.

All that took around three or four hours, and the only repair we need to do is to a loose leg, an easy repair, just a little glue required. Nothing broken - just the fit is loose. I think for a wheel made in 1969 I can accept one leg working a little loose after 40+ years. I've now fitted a new drive band, although I think I might fit a slightly looser one, and I've spun a bit. In doing so I discovered one bobbin sticks a little, the other two run fine. So there is a little more to do, I had cleaned the inside of the bobbins as best I could with pipe cleaners, but suspect they really need something a teeny bit more abrasive to clear away 40+ years of dried oil. By the end my green scrubby was worn to seeds and not up to being cut into strips and flossed through the bobbins, so I've left that for another day. I've waxed the leather at the top of the footman, which may have been a mistake, it's much softer and bends when I treadle which isn't ideal, but I can easily replace it with new stiff leather. Then again, the Pipy has a cord footman and as long as I am in sync with the wheel, that is no problem, soft leather can't be much different to a cord footman.

Here she is, my very own Wendy, spinning, and working rather nicely. So now I have proof she is a working wheel ... Time to park her under the tree and wait till Christmas. After all she is technically a Christmas present ...

Take care

Na stella

Saturday, November 16, 2013

Something new, something borrowed, something old and something blue (kind of)

There is a wedding coming up around here, well not around here, but for some one who has been part of around here. The wedding comes alongside moving to another country for two years ...and has involved significant destashing. Right now there are mixed feelings, happiness for A who is heading off into a new life, new opportunity and new knitting groups alongside some sadness that A will not be here as part of our group, alongside a kind of secret excitement at having been gifted and loaned some of her stash. With all that going on the whole wedding vibe of something new, something old, and something borrowed just seems right, I also have the blue ... in what I am spinning,
New
New
First up, the new, my Piecework arrived this week along with ideas about new things to knit. Usually I just admire the contents and wait until I feel the need to knit them, this time the wash cloth called my name. Recreated by Sarah Lamb after she found one her Great Aunt Gladys had made. This cloth is intended to be knit in a finer thread, the pattern calls for cotton, in size 10 crotchet cotton but I'm using linen thread of a simillar size. I like that this is knit with short rows, in garter stitch with a lace edge, and that it is finer, so will not sit wet in our non-tropical climate.

Technically this is the borrowed, or it could be the blue. A de-stashed two of her loved cookbooks, Artisan bread in 5 minutes a day, and Local Breads by Daniel Leader. I've not. Yet delved into Mr Leaders book, but am loving the Artisan one, which is blue, this bread is from bake number 6, from batch two - but I am following their suggestion to reuse the fridge container without washing so the bread developes a sourdough flavor. I think this batch was too dry, as evidenced by the smallish holes, so the next one is already mixed, and wetter. A also loaned me her Wendy wheel ... which is an adorable wheel that deserves a post all of its own.
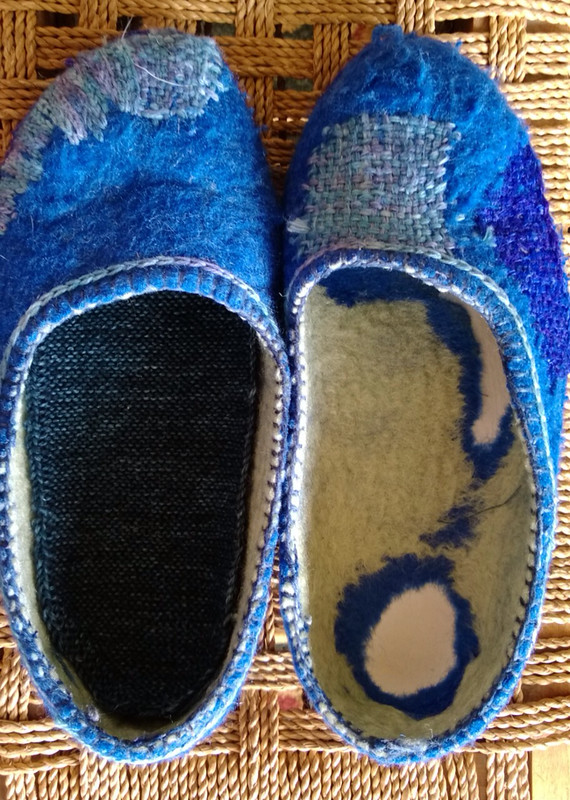
Here is the something old, and the something blue, my mended felted slippers with innersole. As mentioned In the last post, the inspiration came from Icelandic Knitting using Rose Patterns by Hélène Magnússon. In that book the patterns found in a traditional knitted garment, the shoe rag, or innersole are used to inspire other garments. The idea of garter stitch innersoles appealed, so I knit some, based on photos in the book, as there is no pattern. The pattern is a generic one, brief and open to development and interpretation, and at this stage fairly basic, unlike the originals which are intarsia and full of geometric pattern wizardry.[Note: I've since found a pattern that Hélène Magnússon has published on knitted shoe inserts, in Piecework (I subscribe and should have known, duh! ) - here.
Needles, I used the size I usually use for socks, 2.25mm, and suggest you do the same - choose the size you like to use for socks.
Yarn, I used scraps of my favorite sock yarn, Vintage Purls, because I liked the idea of sock yarn with its durable nylon component adding durability, but any yarn you have at hand would work as long as it workd with the needles you choose.
Pattern notes :
  • I always slip the first stitch purlwise with the yarn in front, so the selvedge edge forms a neat chain, not essential - but does make for a nice edge finish.
  • I used an increase that takes one stitch and makes it two, a variation of the knit front and back increase, for simplicity I am calling it kf&b.
  • Cast on, I like to use the crochet cast on, shown here or blogged there, but any cast on will do.
  • Cast off, I used a simple chain cast off, knit two stitches, pass first knit stitch over second knit stich, *knit 1, pass earliest knit stitch over latest knit stitch*, repeat between * until only one stitch remains! break thread and pull through last loop to secure.
  • Yarn ends, I didn't bother weaving these in, you can tuck them under the innersole or use them to stitch the sole in place.
  • I tried just putting the innersoles in my slippers, but they moved and wrinkled, and that annoyed me, YMMV, if the yarn was sticky or the garter thicker maybe they wouldn't need stitching in place.
Pattern, cast on 6 stitches ( or a number simillar to half what you usually cast on for a sock toe) knit one row
  1. Slip 1 stitch purlwise, knit f&b, knit to last 3 stitches, kf&b, knit 2
  2. Slip 1 stitch purlwise, knit to last stitch,
Repeat these two rows until you have 30 stitches, measure how long this increase section is, measure how long your foot (or slipper is) and subtract the length of the increase section from the foot length, the 30 stitches worked for me, being able to stretch to fit the ball of my foot. Find the number that suits your project.
Continue knitting row two until the shoe-rag or innersole measures the 'length of the foot minus the length of the increase section', then start to decrease.
Decrease section
  1. Slip 1 stitch purlwise, k1, ssk, knit to last four stitches, k2tog, knit two.
  2. Slip 1 stitch purlwise, knit to last stitch.

Repeat these two rows until you have 6 stitches, or the number you cast on, cast off, knit a second if needed. Slip stitch in place inside slipper, I flipped the slipper inside out and pinned and stretched the shoe-rag then I stitched, knowing that once the slipper was right side out and worn the innersole would stretch and flatten.
Enjoy - and note this pattern is free, share it, gift it, and use it, feel free to improve it, the pattern is untested by anyone other than I and I'm happy to improve it or fix erata if any one has corrections.
Many thanks - Hope your week runs well, na Stella

Sunday, November 10, 2013

Repair ...

So over the last few years I have become more and more interested in repair as a practice, and I have to say I am becoming more comfortable about repairing and been seen to repair. I grew up in the 1960’s and 1970’s in New Zealand, where for political and economical reasons there was a pretty much a closed economy. You could buy anything, as long as it was made in New Zealand, or that possibly could be made in New Zealand. That meant that when the rest of the developed world had tv, we were waiting for someone to make the components and then make the tv ...cause technically tv's could be made here ( even if they weren't). The same kind of logic applied to all sorts of other things, electronics, cars, toys, shoes, carpets ... pretty much everything one wanted and saw in the media that those overseas had. I know now the media painted a rosey and unrealistic image of a world of plenty - but then I didn't know that. And this was post World War Two, and economically and culturally New Zealand aligned with England, who had a rather slow economic recovery from the war. My parents were children of the war, so their experience was pretty much the stuff you had was the stuff you could afford, and the stuff you could make. My dad was a mechanic, so fixing things was what he did at work, and at home, our house was a fixer-upper, our car old and repaired, and then repaired again, both the motor and the body. My mum sewed, and when we grew the clothes were altered and let out, always in such a way the adjustment was concealed. When the electric kettle died a new element was bought, when a heater, lamp, or radio stopped working a repair was made, either by dad or he took it to a repair shop. My childhood radio was 1960’s white plastic, with valves, two white knobs and one unmatched 1970’s black knob as that as what the repairer had to hand.

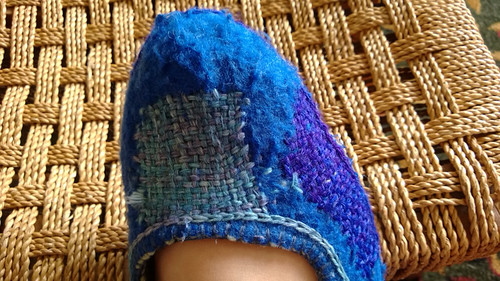
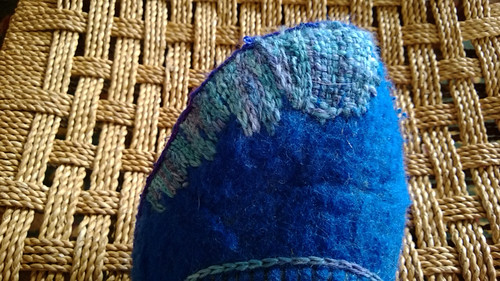
None of that bothered me, that was how we lived. Fixing stuff was just what was done. What did bother me as when china broke, plates or cups, and they were glued together, and continued to be used. I have to admit that was my grandmother not my parents. There was something uncomfortable about a visable repair, a patch, a line of yellow glue oozing out of a mend, a criss-cross of sticky tape across a rip or torn cover or page. What bothered me more was when the repair decayed, the glue yellowed, the sticky tape came unstuck, and the item was worse than before. So recently my hand felted slippers started to wear, and life was busy, too busy to make another pair, but the more I wore them the larger the holes got. I still live in New Zealand but the economic and political climate is very different, I could have stopped and bought any number of replacement slippers ... cheap, mass produced and on the whole ugly. I could have searched out more expensive slippers ... Lambskin lined with soles, but it loved the idea and the feel of my hand felted ones. Then a few days ago I gave in, and darned an hole closed,

It looked good, I used sock yarn and liked the effect, so I added a darn to the instep, where another hole was forming.

And the. I decided that I would try chain stitch over the darn, and I liked the effect, the darn looked like knitting. I added a band of chain stitch around the top edge and another around the edge of the sole. I began to see that this kind of repair could be ok, not ugly and very much not making do.


Ther was just one problem, the inside was as worn as the outside, maybe more so. The only thing that stopped the holes in the felt was a layer of leather, the sole. I knew that stitching over those holes wouldn't be as easy, they were inside and I'd feel any lumps and bumps.

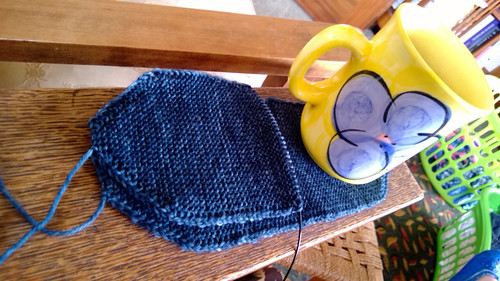
Enter my knitting library, and a book I've had for ages. Icelandic knitting using rose patterns by Hélène Magnùsson. This book explores the garter stitch colour work found in shoe-rags or inner soles and applies the designs to outerwear. I was a little surprised not to find a shoe-rag pattern in the book, but there were heaps and heaps of clear photos of historical examples. After a few false starts where I overthought the process and tried to make anatomically correct innersoles with left and right toe shaping and a narrower heel than the ball of the foot I gave in and knit some as pictured. And these work, surprisingly fantastically so.

Somehow the pointy garter oblong fits into a slipper and moulds itself to fit, garter stitch is magic - beginner knitters don't appreciate how forgiving it is. The innersole adjusts to the shape of the slipper with no wrinkles or bumps. I'm already halfway through the second one ...

Pattern to follow, if there is interest, for those who like warm feet, have worn out slippers and like me are coming to terms with repairing things that take so long and so much knowledge and effort that replacing them isn't an easy option.

Na Stella


Saturday, April 06, 2013

Gaining ground

Look progress! I've been knitting, dealing with the outstanding WIPs, and mending. Mending and I have an odd relationship, I make things, and I do believe that things should be mended, where practical and where possible. But when it comes down to doing mending i find it rather boring, I'd rather be knitting some new project than mending an old worn project, even when the item in question is a favorite hand knit, and I can't wear it as to do so would create more damage.
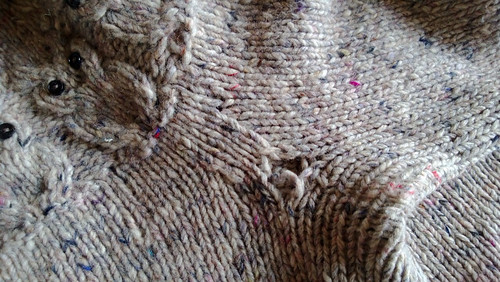
My Owl cardigan had holes in it, and a few weak spots, like this. Just where the arm and body join, at the back armscye. I noticed this at the end of last winter, and this internist upon us here in New Zealand. I diligently dug out my left over yarn and set the cardigan aside for mending. And there it sat gathering dust ...for an entire spring, summer and into autumn.
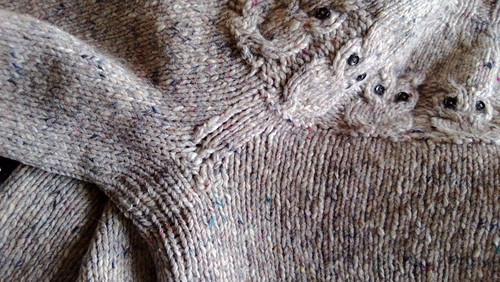
Here it is post mend, not the same hole as above, but a similar one. All mended. Part of me wanted to celebrate the repair, to follow in the footsteps of Tom of Holland with his visible mending program, or Otto van Busch, or Amy Twigger Holroyd and make a clear statement of my mending. Part of me was awa that for much of recent history in the west mended garments have been interpreted as statements of poverty and need - I wasn't sure I wanted to go there just yet. Plus I wasn't sure I wanted to subvert my Owl cardigan into a political statement about mending and repair just now ... I liked it as it was. The mends are not perfect, but are near invisible when worn. I had wondered a out darning the mend but ended up working a swiss darn/grafting style stitch over the thin areas and the holes.
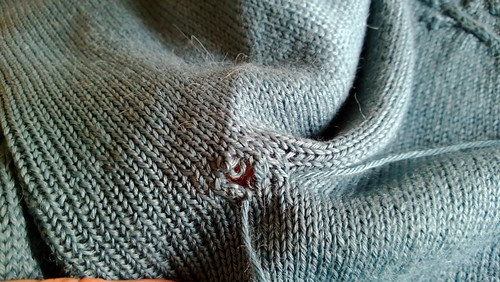
With darning needle in hand, and a start made I continued on to mend the second cardigan in my mending pile. My tangled yoke cardigan, I had left over yarn, and this one had worn in exactly the same places, where the body and arms join.
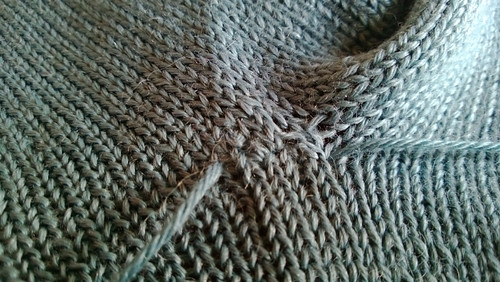
Again the mend was a combination of swiss darning and grafting. Again I ended up either mending or reinforcing all four areas where the sleeve and body join. Turns out that a stitch in time is easier than a full repair! Turns out that those who came before us and did all this first are worth listening to.


I've also dug out my unfinished knitting projects, the ones that I feel guilty about. I've made progress on two. The sanquhar mitts on teeny tiny needles have grown, as has my pi shawl. I'm over half way through the second to last lace band - except it might not be second to last. I choose to knit this on finer needles and so the shawl will be denser and smaller than designed. Knowing that, and knowing the mathematics of a pi shawl I wonder if I should just add a lace repeat or two more? I have plenty of yarn ... I have four more repeats of four rounds (16 rounds) to make a decision.
All in all it seems like I am gaining ground against the mending and the WIPs that lurk around the edges of my hobby time.
Take care, na Stella

Tuesday, October 09, 2012

Bother!

Look! A hole in my owls!

Right at the back of my right armscye, where the underarm graft meets the back, how sad. And yet in another way shows just how much wear this cardigan has had. Still I have a tiny amount of yarn left, and I will try and mend this. The original yarn was a felted yarn, plied but not strong. Already I have repaired the cuffs by knitting them. Owls was knit in January February 2009, so has three years of hard wear. And I have worn and worn this cardigan.


I will try and record the mending process ..

Na stella

Wednesday, September 05, 2012

Socks mended ... Not much else going on

This week has been slow and fast all at once, Bear is away in Christchurch up-skilling and helping out. It's the two year anniversary of the first canterbury quake and he had mixed feelings about being there at all. Still, Bear, is a brave sort, and he is dealing with it. Meanwhile I finally stopped procrastinating about visiting my medic about my oddly stiff shoulder. Seems I have a frozen-shoulder, a sort of random thing that happens to people, mostly women in their forth and fifth decade. Exact cause is unknown, possibly damage or injury, the stiffness or 'freezing' is the body immobilizing the shoulder joint so healing can take place. Current medical opinion is that treatment could be steroid injection, therapy, massage, surgery and plain old time. Apparently latest news is that there is no significant difference in rate of improvement between all those treatments or the shoulder being left to heal on its own. Good news is that it's my left shoulder and I'm right handed. Bad news is there are three stages, and I have no idea which stage I am in and overall it could be somewhere between five months and three years. Optimistically I suspect I've had this for some time already and hope I am in the frozen or thawing stages.

Mending
In amidst all of that, I've been solo parenting, which is fine, usually I am the one who abandons the other parent, so seems fitting it is my turn. I've finished the sock repair. I nearly frogged the first sock top and reworked it to match the repaired sock ... then common sense kicked in and I realized that a repaired sock has value, and is fine as it is.

Cabled sock yarn
Then there is the spinning, after my last weekend of knitting marathon, I've felt the need to spin. I've finished and plied the sock yarn and I love the way it looks. There is 300m, and it is slightly thicker than commercial sock yarn but just fine. I am looking forward to seeing how this knits up and have a cunning plan to make these special socks for a particular person who has cold feet of one kind or another. Enough said, if I say more ... you know, I will have to kill something or change my mind about who the socks are for.

Lastly is the next project, Tempest from Knitty 2008. Modified, of course, in the round defiantly, maybe top down and possibly contiguous construction. I have three skeins of a wonderful blue faced leister sock weight yarn, in a red orange named Elizabeth Bennett. All I need to do is source enough of a second yarn, tonal rather than contrasty, and do the math, and swatch ... and

The list goes on ....Bear is back Friday, away again soon after that, knitting tomorrow night if the cubs are willing ....homework done and they don't wear me out.

Take care, na Stella


Sunday, September 02, 2012

Sunday, September

September, when did that happen, it was only a a few days ago that August was beginning, and now we are in September. Today there isn't much to show, a new spinning project, and a mending project. There has been knitting, a few rounds knit and frogged on my pi shawl. The frogging was the price I paid for leaving it un-attended and then forgetting if the row I marked on the chart was the one I had just done, or the one I was to start with.

Plied singles
Here is the spinning, plied singles from a sock blend, pencil roving in Forest Mist by Vintage Purls. 75% super wash merino and 25% nylon. I spun the singles as fine as I could and with this pencil roving that feels very fine indeed.

Singles
Here is the centre pull ball of singles, I am plying two ply, one end from the centre and one from the outside. So far I spent all of last night plying, and only managed half the singles. Tonight I finally finished the second half. There are two reasons the plying took so long, first I will then ply this again on to itself, to make a four ply cabled yarn, and second - which I hope to be true, that I spun the singles fine enough that I might even approach something like a four ply sock yarn. That was one of my goals when I took up spinning, to spin sock weight yearn. Maybe I might be close with this fibre?

Mending
And mending, these socks, probably knit way back in 2008, and worn a lot since. Oddly the cuff has died, and the toes and socks are looking thick and intact, and just one cuff has died. I can't remember the yarn, either Regia or opal, I suspect Regia, but it has worn well. I do remember taking considerable time to get just the right gauge and stitch count so the printed yarn would work up into the pattern. As for the mend, seems the socks are toe up, with a fairly standard chain cast off at the cuff. My plan is to frog the cast off back past the wear and tear, find a suitable scrap of sock yarn, pick up the stitches and rework the cuff and cast off. The scraps from this sock are long gone, used up in my fish blanket.

So Sunday night there, time to go and knit .... or rather frog then knit the top of the socks. I thought mending was supposed to be a chore, but I am looking forward to seeing how the mend goes.

Na Stella

Saturday, January 28, 2012

Enough - maybe , probably.

I think I have enough yarn, I think I do, I think I do, I think I do. Do you think that if I repeat this mantra as I knit there will be enough? And sorry, seems I am having a flashback to the little train that could. Today I have progress of a good kind on the  Rosebuddie blanket, the dress is nearly finished and I am loving the vintage details in its construction, there is an actual finished object with photos, and a new toy was loaned to me. Now I want one of my own.
Here is the 'first' corner on the Rosebuddie blanket. I say first in a slightly tongue in check way as I have knit the edging up to and around the corner once if not twice before on this very same blanket, so there have been corners before. Last time I realised I would finished the blanket with an enormous amount of yarn left over. At which point I frogged the edging and added a few more repeats of the next-to-last lace panel. I had weighed the yarn I had left just before I began the lace edge, and had 49g. I weighed the yarn again after I reached the first corner, and I had 38g left. Now to me that means a side takes 11 grams of yarn, and if I have three sides left to knit I will use 33g. The celebrations consisted of me sitting in my knitting chair, smiling to myself and checking and rechecking my maths just to make sure. Inside I was all happy and warm, even more so this morning when I layed out the corner for a photo and noticed how pretty it is.
 Wednesday went well, I sewed the vintage dress pattern as planned. I made minor adjustments as my waist is not in the same place as the waist of the pattern, and oddly had to shorten the skirt as the hem was nearly to my ankles. That felt a bit frumpy so the hem now sits just below my knee. I loved the little construction details, like seam binding. In a recent Opp shop purchase I had found a wheel of vintage cream and orange floral seam binding so bought it for the princely sum of $4. The vintage pattern provided three options for neatening the seams, pinking, hand overcasting or seam binding. Seam binding isn't used here in New Zealand, or sold but as I had this to hand I decided to use it. I did practice some economies and over-lock the skirt seam allowances. I loved the effect of the seam binding so much I didn't want to use it all up in the one garment. I also like the weird mix of modern overlocking with vintage seam binding .... some historian somewhere will be very confused by that mix.
 Because the dress was designed in a time when seam binding was common the instructions were written to allow very precise and neat finishing of the inside edges. I didn't quite know how this edge would work out but followed the instructions and I'm pleased I did. Look so neat, the way the seam binding fits together where the button fly at the front and the neck facing meet. There were also instructions for hand stitching a button hole, something I can do and have done, but this time I went for machine button holes, I wanted to wear this dress this month, and hand stitch button holes take forever to work.
 This is one more project off the needles, Dark and Twisty. Little wristers in sock yarn, cabled and ribbed. Little cub has been wearing these most days, despite it still being summer and warm, so these should get a lot of wear come winter.
 Now this is the toy that I was loaned, a wee darning aid. At first I didn't quite understand why this would be any better than darning by eye, and hand and using a mushroom or egg. But I love playing with knitting and sewing toys so I dug out a old knit swatch and pretended it had a hole in it.
 Wow! I love this, I want one, I really do. I dont' darn, much or often or even like this but I want one of these. This little gadget make darning a very even square patch easy, I was impressed by the clever little hooks that lift and turn the warp so you can just slide the darning needle across instead of weaving up and down through all the threads. Now this darn breaks many of the rules given in old books, especially where they suggest staggering the edges so the darn blends in better, but I like it. I have all sorts of ideas about using this to decorate knit or not knit things. The back is neat and tidy to, but didn't photograph well. I imagine if there was a hole I could either neaten the edges by stitching them to the darn, or trim them away, or both.

Tomorrow the cubs go back to school and Bear and I both return to work, until now one or the other of us has been at home for childcare purposes. Tomorrow is the first standard week of the  working year for all of us. That means today is all about making sure the cubs are clean, tidy, washed, and ready to go to school. There will also be baking as things are prepared for lunch boxes, and books are labeled, shoes polished, bags emptied of the fun holiday stuff and filled ready for school. Excuse me as I go and be a parent, instead of a Knitter.

na Stella

Wednesday, March 02, 2011

Knit surgery - or Do not try this without

confidence,
There are some things that sound like a good idea, and they are a good idea, but undertaking them requires a leap of faith. Even more so when the work belongs to another knitter.
This week there has been more knitting on the grey band around the blanket .. those seemingly never ending rounds ... so progress is slow and honestly the blanket looks much like the last post. But the end is in sight ... I'm now working the points at the top of the lace ... so counting down to a colour change and direction change.

Alongside that project .. I have spend some time with another knitters project, K's Balletomane. K was lovely enough to want to knit Balletomane before the pattern was ready .. and so didn't have the advantages of the photos and finished pattern and diagram. As soon as I shipped her the finished pattern .. she mentioned that the shape she had knit was not the shape in the photos. Opps - totally something I had missed, a sentence to the effect that when working the shoulder ... one needed to make sure one was at a particular side of the work .. before separating the two sections to work the yoke. If one was not .. then the shoulder would be constructed 'upside-down' or 'backwards'.

Opps.
But I'm not one to walk away from a knit problem, well I am sometimes but this seemed so fixable. In simple terms, there were two possible fixes, the shoulder section needed to be removed and swivelled 180 degrees, and then grafted back into place .. or the entire side of the ballet-wrap needed frogging and reknitting. Reknitting is kind of boring .. so I offered to perform the surgery. K was incredibly trusting, either that or she didn't fully realize what I was proposing to do to her beaded shaped knitting ....

Which was this. Here is her knitting once I had removed the shoulder but before I had rotated the shoulder piece. One I turned the shoulder section 180 degrees I grafted it into place the right way around.
So far so good, grafting garter stitch takes a wee bit of planning, making sure that one side is a purl row and the other is a knit row .. and then keeping attention as to where to thread the yarn to make the new stitches.

Tricky and fiddly but it is possible.

I'll show you the finished section once K has given her seal of approval.


Oh - and this is the first K has seen of it .. so K - remember to breathe :D

Na Stella

Saturday, November 06, 2010

Mending ...

Mending, one of those chores that I tend to ignore and put aside. I'd much rather knit new yarn into new things, or frog a project and knit it into something new and exciting than mend. That said usually there isn't much around to mend, most of our clothes tend to be buttonless nowadays, tee shirts and stretch tops, so replacing buttons is not a weekly event, yearly perhaps but not weekly. The same with holes or worn bits, clothes are just cheaper and more plentiful than in days gone by .. for lots of reasons, economics of production and scale and trade, and expectations and standards of living, not to mention use of hard wearing synthetics to add durability to things. There are a few times when I will mend things, and more and more the things I take time to mend are the things that I've taken time to make. This week I sat myself down and mended smallest cubs sock, the one with the hole in the toe, and I checked the blanket was all done by piecing it all together (it would be easy to miss a square, cast off prematurely and delude my self), and I started three new projects (two with charts galore). Yes it is official - I have no self control when it comes to keeping the pile of knitting projects beside my chair in check.


So mending, a few weeks ago I posted about the hole in smallest cubs sock. One thing I have realized about kids is that if something is uncomfortable they won't wear it - but they will sit playing on a cold hard floor in the most uncomfortable position to play ... go figure. I just knew that if I darned this sock there was a risk that the slight bump of the darn would mean the sock was rejected. Oh in the old days, when socks were mended as a matter of course I doubt a child or adult would have dared mention the discomfort of a darn least they be told how ungrateful they were and left with holes or had to mend their own. But I live in a modern world so my kids, well when I said they were works in progress that includes the part where they say what they think instead of stopping to consider the consequences. I could just imagine my youngest telling me 'it feels strange'. So I decided to reknit a new toe, first I snipped a stitch just above the hole.
Then I raveled stitch by stitch one row of stitching, you can see the hole more clearly here. It was a good size - large enough for a toe to poke out. Because this was a worn sock, one that had been washed a few times - the stitches behaved beautifully, and held around waiting for me to pick them up.


Once I had separated the end of the sock with the hole from the rest of the sock I picked up all the stitches onto my standard sock needle (2.25mm). One advantage of mending ones own knitting is having a record of needle size and stitch counts to work with.


Then I headed off to the stash of left over sock yarn and sorted out one that would work with the pink.


Blue it was, I started to knit, decreasing 4 stitches as per usual every second round until I had the same number of stitches I had cast on for the sock.


Then I grafted it closed from the outside, over a darning mushroom. Handy things those darning mushrooms even when one is not darning.

On the inside the new section is a little less fuzzy than the original section of the sock. I wove in all the ends, the one from unraveling the sock, the one from starting to knit with the blue, and the tail from the grafting the toe closed.

And all done, possibly a bit weird to have one blue toe on a pair of socks - but a successful mend. Time taken - less than one hour all up including a cup of tea and stopping to hunt for a suitable yarn to use. I briefly thought of replacing the second toe 'just-in-case' but a quick examination showed no sign of a hole forming. It probably was as I said, unkempt toe nails that caused the wear and tear.

So the blanket is all there, I've checked as did Yo-yo the cat. I half expected to have her curl up and sleep on the blanket .. but no the end of the hallway was in direct sunlight so she stretched out and sleep there. My next step on this project is to locate a yarn to seam it with - odds are there is something in stash, when that is done I have a wheel of white ready to use as an icord edging - then it will be ready to block.

Knitters Study Group was Saturday(yesterday). We have two sessions on Estonian knitting, the idea is a small sampler type project ... I've started an alpaca scarf. This is loosely based on one in Nancy Bush's Lily of the Valley Scarf in Lace of Estonia, but I'm planning to work the body of the scarf in the Greta Garbo Hearts Number 3. My scarf will be wider to allow 3 repeats of the hearts across the width of the scarf .. and so far so good. I've worked the edging -and thought I'd work the other edging then work the two ends of the scarf at once ready to graft together in the middle.

And then there was knit night, where I needed a project with no chart, one that could handle conversation, distractions and stop start knitting. I was tempted by Heart of Glass by Vintage Purls, and I have the pattern but seems I used the yarn in the sock kit as the contrast in my Nightingale. Nothing else in stash seemed right for Heart of Glass ... so I started Spiral Bound instead. Its fun .. a nice straightforward knit at least for now - that might all change as I get to the heel which like all her heels is nicely planed to fit with the stitch pattern.

There is a third new project on the needles .. but that one is a secret project .... one I can't blog, yet .... but it has a chart and colour and is soft and squishy.

So with any luck this week will be clearer, with less time allocated to meetings and marking - except I have only 4 weeks of work left this year so my time will be full of meetings and marking. But it is spring, it is warmer and the evenings are lighter so there seems more time to do things in. Take care .... hope your knitting basket is full of fun stuff

Stella