I over-think things sometimes, and I know I over-think, I over research, I overplan, and as a result I most certainly over-think Today I thought I had one example of over-thinking, but when I sat down to blog ... I realized that there were at least two overthunk projects to report. First up is my over-thunk knitting, I made a start on my modified Tempest, using the Contiguous top down method, and because of the overthinking I am about to make a second start. Second is progress on the Pirate socks, I am turning corners - or as it is a sock, the heel. Lastly is a Tambour update - or sort of info sub-page, what I know now that I didn't know before, and that might be useful to someone out there looking. If you have come for a brief summary of Tambour resources on the net --- that information begins after the knitting content.

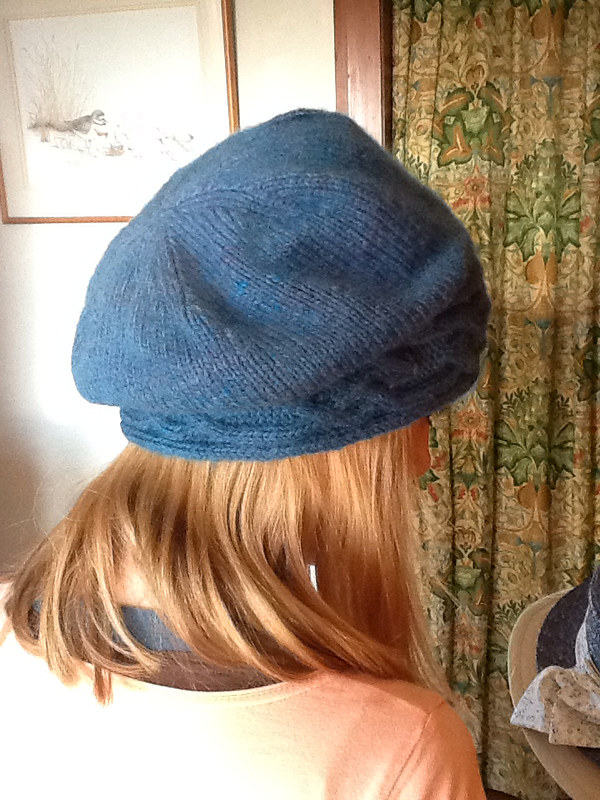
Knitting and overthinking, well last thursday I cast on for my top down contiguous cardigan in the style of Tempest. I had a gauge swatch and the instructions and diligently worked out how many to cast on. cast on, looked at the number of stitches. I decided the cast on edge was too short, so added a few stitches, then frogged and added more. Then frogged and added even more, thinking about how the neck band would take up some of the edge so the cast on needed to be longer. Finally last night, when I had worked 4 or five cm's and saw the shoulder sam developing, I realised how huge the back neck edge saw the light and rethought my cast on numbers.
 I found a favorite cardigan, a Nom*d Momma Jack, one of the few cardigans I have that has a shoulder seam. Measured it has exactly the measurements I started with when I was planning my tempest! So I'm setting aside the amended start and starting again with strict instructions to myself not to overthink this time.

Little cubs Pirate sock is doing well, I'm half way through the heel flap, worked as per the first in a k1s1 offset pattern. Dividing my time between several knit projects means that each seems to grow even more slowly, I may have to manage my time so one is finished soon just so I have that buzz of finishing something.
Tambour, this is a specialized form of needlework, worked using a hooked needle. When done the work looks like a stitched chain. Chain stitch can be worked many ways, the most usual seems to be with a short length of thread threaded through a needle and stitched. Tambour stitching looks the same but is worked from a spool of thread, so long unbroken lengths of thread, with a hooked needle, and on fabric stretched tight across a hoop or frame. Little cub pointed out tambour is a like a row of knitting stitches, and it is, and I guess the free form of tambur is crochet, worked with a hooked needle and no fabric support, instead the chain stitches become the fabric. Way back in 2009 I took a weekend workshop with Katya, from Lucellan.com, and learned the basics (blogged here). Since then I have Tamboured off and on as the mood to improve takes me, each return to practice seems to leave me a little more able to work the stitches without snagging fabric or fingers.

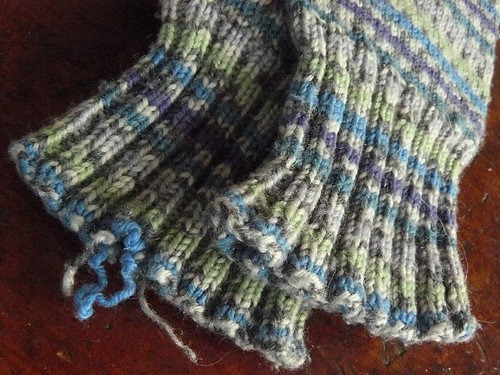
Here is my last practice piece, worked on a scrap of blue woolen fabric. I planned to continue to work and improve my chain stitch, no beads just yet. I wanted to practice working an even and neat chain stitch and placing the stitches next to each other to make a fill pattern. I also had a play with different threads, and with working corners or changes in direction. I read about working back over a chain with a zig-zag pattern, and tried that on the last ring of the work. I find working the smallest curves next to each other hardest - they pull away even when I think I have the needle right next to the previous line of chain.
As with everything, part of learning new techniques is a parallel search for information online and in books. I found several sites online that are useful for building up knowledge and skills, and thought it might be a good idea to list them here. This is the second example of over-thinking in this post, where I am pulling together all sorts of information from all sorts of different sources to help me build a picture of what Tambour is like, and how it can be done. So for those who came for the knitting, now is a good time to stop, no need to read to the end, for those who came for some Tambour information read on.
take care
na Stella
First up Tambour work is known by a several different names around the world. In France the name Luneville seems to be the most common, and there is a famous emboidery firm/school the House of Lesage, said to provide much of the couture beading and embroidery for design firms.
This seems to be the best beginner video tutorial online, from Bob Haven, a teacher trained at Lesage. Bob has several videos online, and all seem valuable, he even provides a large scale serries of photos showing really clearly the way the chain stitch works.
In India the term Zari is used, and the embroidery worked with a hook that looks more like a tiny crochet hook in metal and is called an aari needle. The Aari needle is different to a Luneville and Tambour styles where the hooked needle is held in a handle and able to be removed and changed. Zari embroidery is explained in a serries of Youtube videos by Expert Village, here. The commentary is a fairly broad, without too many detailed hints, but if you watch closely there is a huge amount of technique that can be learned around how to make the stitches work, especially when working Satin type stitches. Watching the Expert Village Zari embroiderers I learned that to work corners, and turns and satin stitch I need to place two or more tiny stitches to before changing the direction I stitch in. this is just one of seventeen videos on show demonstrating the technique by ExpertVillage.
I've been seeing all sorts of methods and techniques as I have been looking around for free-online information on Tambour and other similar methods. I switched out the blue woolen fabric for some finer white cotton and tried some other stitch arrangements. I used a thicker white DMC cotton, denier 25, and a finer yellow Mettler cotton denier 40. I tried different hook sizes and finally settled on a 90 or 100 for using with these threads. The 100 leaves a punch hole, the 90 sometimes snags ... long term I suspect I will improve my technique and be able to consistently use a finner hook/needle. I especially like the statin stitch worked over a few close rows of chain stitch, the result is like a fancy braid. I also tried following a light pencil line as a guide, first with a word, and then with the flower and the paisley shapes. I bought some fine Batiste cotton, and the next stage might be to decide on pattern and see how I go with working to it. As I was working this little cub has been very interested, enough to try, but she abandoned it as too-tricky for now. Interestingly she noted the similarity between the chains in this work and those of knitting, she said that I hadn't knitted the middle of some of the shapes yet. I like that, and part of me is wondering how I can develop a design that links the knitting to the tambour work.

One of the differences between Western Tambour /Luneville embroidery technique and Indian technique seems to be in how beads are included in the work. In Tambour and Luneville the beads or sequins are attached on the underneath side of the work, opposite to where the chain stitch is formed. In Zari work the beads or sequins are attached to the uppermost side of the fabric, where the chain stitch is worked. In the Bob Haven video above you can see how he is placing a bead under each stitch as he works, in Zari work the bead(s) or sequin(s) are placed on the hook as shown in this video. There are lots of other videos showing beading this way, some with dozens of beads or sequins stacked up the needle ready to be worked, some in which the worker picks up one bead at at time like in this video.
Tambour embroidery is called other things in other places, Mary Corbert's site has a post by Margot that lists even more variations on names
Tambour work seems to be worked on a huge variety of fabrics, sheer organza for French Courture beading, both sheer and opaque fabrics for Zari work, on net or mesh as a form of lace, white-on-white as a form of texture work on cotton or linen, and on warm soft opaque wollen fabric in heavy stranded yarns to form warm shawls and wraps.
Tools, Supplies, Handles and Hooks - I have at the moment found three sources, the most commonly referenced source of Tambour Handles and hooked needles is Lacis. Lacis also list 'vintage' hooked needles, from the UK and Germany. There has to be other sources, I've found two more, several blog posts suggested that the Tambour handles from Brodely are a shape, finish and balance, that is nicer to use. I can't say myself (yet), I've ordered a handle in Violetwood and a smaller handle in Ebony, something about the fact that there is a choice of wood and sizes seems to offer a more technical choice than Lacis. Update - I received Handles from Brodely and they are lovely, imho nicer than the Lacis ones but that may be just having a choice of wood. I do like how there are two sizes, which means the hook is held more centered with the handle, the hook in my lacis handle tends to lean at an angle due to the tightening screw pushing it out of alignment. Broderly have a wider range of hook sizes. Lacis do also list several latched needles, which some sites and videos class as Tambour hooks. Brodely seems a good source for PomPoms (!) of sequins, if you are feeling like a little bling, they have sequins as small as 3m in flat and cupped. And yes apparently a loop of sequins is officially labelled as a PomPom, that just makes me want to buy a PomPom or two if only I could decide what colour, size, finish and what on earth to do with it. the third source is here, where the handle and hooked needle is called a Beavais or Luneville Hook and listed as 'for beginner'. I have one of these on the way as well and will update and post reviews when all the hooks arrive. This hook is inexpesive plastic and the hook is set permanently into the handle, perhaps a good choice for teaching, as the hook is a bit mellower, less of a sharp snag than the Lacis and Brodely hooks, but not as nice to own. I do have to say that shipping across the world, from Europe to New Zealand was good value, at Euro 6, flat rate from both sources, no matter what I put in my cart (yes I put a lot of pompoms in and then took them out just to see what the shipping would be). Ages ago I was sent a link to beautiful hand turned Tambour hooks, and I am currently searching my email archives to locate the source (Suzanne if you remember I'd love to update this sources list). There are of course vintage hooks on Ebay, some are more like a Aari hook, in the hook is fixed into the handle, others are simply stunning but out of my league (sorry link will probably expire when the auction closes- I've linked to my Pinterest in the hope the hope the link continues to work).
Threads, well I've not found much online about threads, I have started a Pinterest Board, called Embroidery, where I've been clipping all sorts of images relevant to Tambour, Zari, and Luneville. There seems to be a variety of threads used, thicker ones for when the stitches are the feature, thinner ones for attaching beads and sequins. On one of my searches, I found Shirlee Fassell's blog, NeedleandHook, where she posted about identifying the thread that Lesage use. Madeira Number 30, and also a french source of Sequins. I had also been told that One-G thread is one of the better ones to use for tambour beading, as the thread is strong enough to take wear and tear from both the hook and the beads, and snags less. I've one spool from a local crafter, but I'm sure you will find a stockest near you as there are lots for sale online.
Books, well as far as books go, many peoples 'go-to' books that are recommended are shown here, I've seen any of these in person so can't comment, except to say any book is usually better than no book, and it is not a common topic to find books on. A long way to say, I'd pretty much buy any book that was affordable. There is a newish book out published by Lesage, in French but with apparently amazing photos, link to photo of page here. I'm trying not to buy it, along with Katya from Lucellan.com, who is not helping me not buy it, as she suggests we share shipping on two, one each.
More info, there are other blogs out there that do a much better job of showing you the Tambour work they have done, especiallly when the authors have attended workshops by Bob Haven or at Lesage, blogs like EmbroideryAddict, and Stitching in the pursuit of happiness. Both blogs cover tambour work and what they are learning in more than one post, EmbroideryAddict posts go back several years, whilst Stitching in the Pursuit of happiness has only just attended two Tambour workshops ...so there will be more to come. There are a whole host of bloggers and posters out there to discover as well, in english as well as german and french, as a quick google search will show.
Update October 2013: searching YouTube for combinations of Zari, Aari, Maggam, satin stitch and filling stitch, or long and short stitch will lead to a number of videos showing various technique, this one shows the satin stitch, and this one long & short stitch.
I was recommended the book - Emboidery with Beads by Angela Thompson, the images are dated but the chapter on Tambour contains some of the clearest instructions i have come across on how to start and finish tambour stitching - I have yet easily work the finish know - but understand how it works and with every attempt my working is improving. My copy was a less than $3 on Ebay.
Mary Corbet's Needle and Thread site also has some fantastic information on Tambour work, and Mary is much more experienced at teaching embroidery than I.
So sorry, this is a much a longer post than usual, but I felt the need to round up all I've been finding and learning, it at all it could be useful to others.
na Stella

Knitting and overthinking, well last thursday I cast on for my top down contiguous cardigan in the style of Tempest. I had a gauge swatch and the instructions and diligently worked out how many to cast on. cast on, looked at the number of stitches. I decided the cast on edge was too short, so added a few stitches, then frogged and added more. Then frogged and added even more, thinking about how the neck band would take up some of the edge so the cast on needed to be longer. Finally last night, when I had worked 4 or five cm's and saw the shoulder sam developing, I realised how huge the back neck edge saw the light and rethought my cast on numbers.


Little cubs Pirate sock is doing well, I'm half way through the heel flap, worked as per the first in a k1s1 offset pattern. Dividing my time between several knit projects means that each seems to grow even more slowly, I may have to manage my time so one is finished soon just so I have that buzz of finishing something.
Tambour, this is a specialized form of needlework, worked using a hooked needle. When done the work looks like a stitched chain. Chain stitch can be worked many ways, the most usual seems to be with a short length of thread threaded through a needle and stitched. Tambour stitching looks the same but is worked from a spool of thread, so long unbroken lengths of thread, with a hooked needle, and on fabric stretched tight across a hoop or frame. Little cub pointed out tambour is a like a row of knitting stitches, and it is, and I guess the free form of tambur is crochet, worked with a hooked needle and no fabric support, instead the chain stitches become the fabric. Way back in 2009 I took a weekend workshop with Katya, from Lucellan.com, and learned the basics (blogged here). Since then I have Tamboured off and on as the mood to improve takes me, each return to practice seems to leave me a little more able to work the stitches without snagging fabric or fingers.

Here is my last practice piece, worked on a scrap of blue woolen fabric. I planned to continue to work and improve my chain stitch, no beads just yet. I wanted to practice working an even and neat chain stitch and placing the stitches next to each other to make a fill pattern. I also had a play with different threads, and with working corners or changes in direction. I read about working back over a chain with a zig-zag pattern, and tried that on the last ring of the work. I find working the smallest curves next to each other hardest - they pull away even when I think I have the needle right next to the previous line of chain.
As with everything, part of learning new techniques is a parallel search for information online and in books. I found several sites online that are useful for building up knowledge and skills, and thought it might be a good idea to list them here. This is the second example of over-thinking in this post, where I am pulling together all sorts of information from all sorts of different sources to help me build a picture of what Tambour is like, and how it can be done. So for those who came for the knitting, now is a good time to stop, no need to read to the end, for those who came for some Tambour information read on.
take care
na Stella
Sub-heading - most of what I have found out online about Tambour Embroidery as of September 2012 (updated Sept 2013).
First up Tambour work is known by a several different names around the world. In France the name Luneville seems to be the most common, and there is a famous emboidery firm/school the House of Lesage, said to provide much of the couture beading and embroidery for design firms.This seems to be the best beginner video tutorial online, from Bob Haven, a teacher trained at Lesage. Bob has several videos online, and all seem valuable, he even provides a large scale serries of photos showing really clearly the way the chain stitch works.
In India the term Zari is used, and the embroidery worked with a hook that looks more like a tiny crochet hook in metal and is called an aari needle. The Aari needle is different to a Luneville and Tambour styles where the hooked needle is held in a handle and able to be removed and changed. Zari embroidery is explained in a serries of Youtube videos by Expert Village, here. The commentary is a fairly broad, without too many detailed hints, but if you watch closely there is a huge amount of technique that can be learned around how to make the stitches work, especially when working Satin type stitches. Watching the Expert Village Zari embroiderers I learned that to work corners, and turns and satin stitch I need to place two or more tiny stitches to before changing the direction I stitch in. this is just one of seventeen videos on show demonstrating the technique by ExpertVillage.
I've been seeing all sorts of methods and techniques as I have been looking around for free-online information on Tambour and other similar methods. I switched out the blue woolen fabric for some finer white cotton and tried some other stitch arrangements. I used a thicker white DMC cotton, denier 25, and a finer yellow Mettler cotton denier 40. I tried different hook sizes and finally settled on a 90 or 100 for using with these threads. The 100 leaves a punch hole, the 90 sometimes snags ... long term I suspect I will improve my technique and be able to consistently use a finner hook/needle. I especially like the statin stitch worked over a few close rows of chain stitch, the result is like a fancy braid. I also tried following a light pencil line as a guide, first with a word, and then with the flower and the paisley shapes. I bought some fine Batiste cotton, and the next stage might be to decide on pattern and see how I go with working to it. As I was working this little cub has been very interested, enough to try, but she abandoned it as too-tricky for now. Interestingly she noted the similarity between the chains in this work and those of knitting, she said that I hadn't knitted the middle of some of the shapes yet. I like that, and part of me is wondering how I can develop a design that links the knitting to the tambour work.

One of the differences between Western Tambour /Luneville embroidery technique and Indian technique seems to be in how beads are included in the work. In Tambour and Luneville the beads or sequins are attached on the underneath side of the work, opposite to where the chain stitch is formed. In Zari work the beads or sequins are attached to the uppermost side of the fabric, where the chain stitch is worked. In the Bob Haven video above you can see how he is placing a bead under each stitch as he works, in Zari work the bead(s) or sequin(s) are placed on the hook as shown in this video. There are lots of other videos showing beading this way, some with dozens of beads or sequins stacked up the needle ready to be worked, some in which the worker picks up one bead at at time like in this video.
Tambour embroidery is called other things in other places, Mary Corbert's site has a post by Margot that lists even more variations on names
Tambour embroidery is known by many names: Carrickmacross (Ireland), Limerick (Ireland; there is also a needle version of this lace), Coggeshall (England), Lier (Belgium), Lunéville (France), and there are probably many more whose names I've forgotten.
Tools, Supplies, Handles and Hooks - I have at the moment found three sources, the most commonly referenced source of Tambour Handles and hooked needles is Lacis. Lacis also list 'vintage' hooked needles, from the UK and Germany. There has to be other sources, I've found two more, several blog posts suggested that the Tambour handles from Brodely are a shape, finish and balance, that is nicer to use.
Threads, well I've not found much online about threads, I have started a Pinterest Board, called Embroidery, where I've been clipping all sorts of images relevant to Tambour, Zari, and Luneville. There seems to be a variety of threads used, thicker ones for when the stitches are the feature, thinner ones for attaching beads and sequins. On one of my searches, I found Shirlee Fassell's blog, NeedleandHook, where she posted about identifying the thread that Lesage use. Madeira Number 30, and also a french source of Sequins. I had also been told that One-G thread is one of the better ones to use for tambour beading, as the thread is strong enough to take wear and tear from both the hook and the beads, and snags less. I've one spool from a local crafter, but I'm sure you will find a stockest near you as there are lots for sale online.
Books, well as far as books go, many peoples 'go-to' books that are recommended are shown here, I've seen any of these in person so can't comment, except to say any book is usually better than no book, and it is not a common topic to find books on. A long way to say, I'd pretty much buy any book that was affordable. There is a newish book out published by Lesage, in French but with apparently amazing photos, link to photo of page here. I'm trying not to buy it, along with Katya from Lucellan.com, who is not helping me not buy it, as she suggests we share shipping on two, one each.
More info, there are other blogs out there that do a much better job of showing you the Tambour work they have done, especiallly when the authors have attended workshops by Bob Haven or at Lesage, blogs like EmbroideryAddict, and Stitching in the pursuit of happiness. Both blogs cover tambour work and what they are learning in more than one post, EmbroideryAddict posts go back several years, whilst Stitching in the Pursuit of happiness has only just attended two Tambour workshops ...so there will be more to come. There are a whole host of bloggers and posters out there to discover as well, in english as well as german and french, as a quick google search will show.
Update October 2013: searching YouTube for combinations of Zari, Aari, Maggam, satin stitch and filling stitch, or long and short stitch will lead to a number of videos showing various technique, this one shows the satin stitch, and this one long & short stitch.
I was recommended the book - Emboidery with Beads by Angela Thompson, the images are dated but the chapter on Tambour contains some of the clearest instructions i have come across on how to start and finish tambour stitching - I have yet easily work the finish know - but understand how it works and with every attempt my working is improving. My copy was a less than $3 on Ebay.
Mary Corbet's Needle and Thread site also has some fantastic information on Tambour work, and Mary is much more experienced at teaching embroidery than I.
So sorry, this is a much a longer post than usual, but I felt the need to round up all I've been finding and learning, it at all it could be useful to others.
na Stella